Build an AI Agent with AutoGPT: Step by Step (2026 Guide)
Learn how to build an autonomous AI agent with AutoGPT. This step-by-step tutorial covers installation, configuration, and creating your first working agent.
Imagine having a research assistant that never sleeps, doesn’t ask for breaks, and can autonomously browse the web, analyze data, and compile reports—all while you focus on higher-level decisions. That’s not science fiction. That’s exactly what AutoGPT enables you to build as part of a modern AI productivity workflow.
I’ve spent the last three months experimenting with autonomous AI agents, and I can tell you: the hype is real, but so are the pitfalls. Most tutorials you’ll find online are outdated, showing the old terminal-based version that’s now in maintenance mode. Others skip over the practical details that matter—like how much this will actually cost you or what to do when your agent gets stuck in an infinite loop.
This guide is different. It’s updated for February 2026, focuses on the modern AutoGPT Platform (not the legacy version), and walks you through building a real, working agent in about 30 minutes. By the end, you’ll have an autonomous research agent running on your machine, and you’ll understand exactly how to customize it for your own use cases.
What is AutoGPT?
AutoGPT is an open-source framework for building autonomous AI agents—systems that can pursue goals with minimal human intervention. Unlike ChatGPT, which waits for your next prompt, AutoGPT agents run in a continuous loop: planning tasks, executing actions, observing results, and adapting their strategy.
Here’s the key difference: ChatGPT is conversational. You prompt, it responds. AutoGPT is autonomous. You give it a goal, and it figures out the steps to achieve it. For more on the fundamental differences, check out our guide on what are AI agents and how they differ from traditional chatbots.
AutoGPT comes in two flavors, and understanding the distinction matters:
| Feature | AutoGPT Classic | AutoGPT Platform |
|---|---|---|
| Interface | Terminal/CLI | Visual Web UI |
| Setup Complexity | High | Medium |
| Best For | Developers who want maximum control | Technical users who prefer visual workflows |
| Status | Legacy (maintenance mode) | Active development |
| Learning Curve | Steep | Moderate |
AutoGPT Classic was the original release that went viral in 2023, amassing over 170,000 GitHub stars in record time, making it one of the fastest-growing open-source projects in history 1. It’s powerful but requires significant technical setup and comfort with command-line interfaces.
AutoGPT Platform, launched in late 2024, provides a visual workflow builder that makes agent creation accessible to a broader audience while maintaining the underlying power. This is what we’ll be using today.
The “autonomous” part comes from the agent loop: a cycle of planning → acting → observing → reflecting that continues until the goal is achieved or a stopping condition is met. The agent can use tools like web search, file operations, and API calls to accomplish tasks.
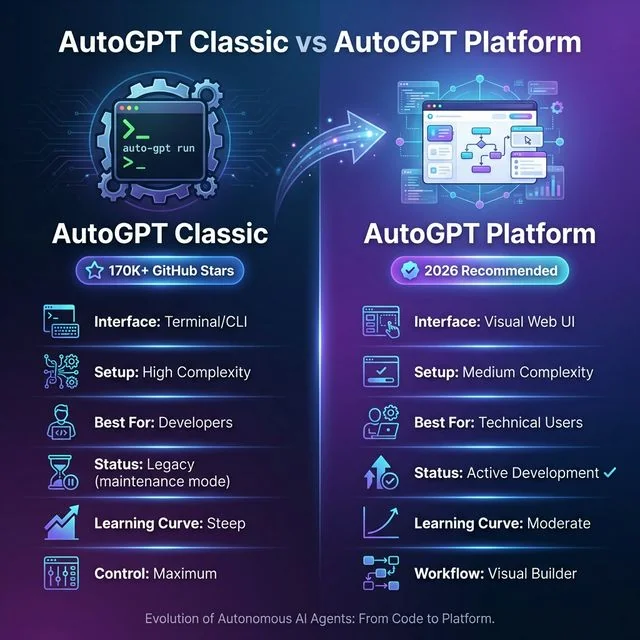 AutoGPT Classic vs Platform: The evolution from terminal-based CLI (170K+ GitHub stars) to the modern visual web interface. Platform offers medium complexity setup with visual workflow builder and active development, making autonomous AI agent creation more accessible in 2026.
Real-world use cases include market research automation, competitive analysis, content research, data processing pipelines, and repetitive workflow automation 2. If you’re looking for inspiration, we have a list of AI agent use cases that are transforming businesses in 2026. In fact, research from McKinsey indicates that over 60% of organizations are now actively experimenting with agentic AI workflows 3.
Prerequisites & Requirements
Before we start, let’s make sure you have everything you need. I learned the hard way that skipping this step leads to frustrating mid-tutorial detours.
System Requirements
- Python 3.10 or higher (3.11 recommended)
- 4GB RAM minimum (8GB+ recommended for complex tasks)
- 2GB free disk space
- Git installed
- Modern web browser (Chrome, Firefox, Edge)
Required Accounts
- OpenAI API key with billing enabled (this is where costs come in)
- GitHub account (for cloning the repository)
Optional but Recommended
- Docker Desktop (for containerized setup)
- VS Code or similar code editor
- API access to other LLMs (Anthropic Claude, Groq for alternatives)
What This Will Cost You
Here’s the part most tutorials bury in the fine print: AutoGPT is not free to run. It uses OpenAI’s API, which charges based on token usage. For the tutorial exercises here, expect to spend $0.50-$2.00. For regular use, budget $5-20/month depending on usage.
Before You Start: Have your OpenAI API key ready. AutoGPT primarily uses GPT-5 which costs approximately $0.01-0.03 per 1K input tokens and $0.03-0.06 per 1K output tokens, depending on the specific model variant 4. Set a hard spending limit in your OpenAI dashboard before proceeding.
Skill Level
This tutorial assumes you’re comfortable with:
- Basic command line operations
- Installing Python packages
- Editing configuration files
If you’re completely new to coding, you might find AgentGPT more approachable, though less powerful.
Step 1: Install AutoGPT Platform
Let’s get the software running. I’ll show you two methods: direct installation (recommended for most users) and Docker (for those who prefer containerized environments).
Method A: Direct Installation (Recommended)
Open your terminal and run these commands:
# Clone the AutoGPT repository
git clone https://github.com/Significant-Gravitas/AutoGPT.git
cd AutoGPT

# Navigate to the Platform directory
cd autogpt_platform

# Copy the environment template
cp .env.example .env

# Create a Python virtual environment
python -m venv venv

# Activate the virtual environment
# On macOS/Linux:
source venv/bin/activate
# On Windows:
venv\Scripts\activate

# Install dependencies
pip install -r requirements.txt
What just happened? We downloaded the AutoGPT codebase, created an isolated Python environment (to avoid conflicts with other projects), and installed all required packages.
If you see errors about Python version, make sure you’re running 3.10 or higher:
python --versionMethod B: Docker Setup (Alternative)
If you have Docker Desktop installed and prefer containerization:
# Clone the repository
git clone https://github.com/Significant-Gravitas/AutoGPT.git
cd AutoGPT/autogpt_platform

# Copy environment file
cp .env.example .env

# Build and run with Docker Compose
docker-compose up -d
Docker handles all the dependencies automatically, which is nice. However, I’ve found direct installation gives you more flexibility for customization later.
Verify Installation
Before moving on, let’s make sure everything installed correctly:
# Check if the server starts
python -m autogpt --help
You should see the help menu without errors. If you get import errors, try reinstalling requirements:
pip install -r requirements.txt --force-reinstallStep 2: Configure API Keys
Now for the critical part: connecting your agent to AI models. This is where the magic happens, but also where costs are incurred.
Getting Your OpenAI API Key
- Go to platform.openai.com
- Sign in or create an account
- Click on your profile → “View API keys”
- Click “Create new secret key”
- Copy the key immediately (you won’t see it again)
- In your billing settings, add a payment method and set a hard usage limit (I recommend $10 for beginners)
Configuring Environment Variables
Open the .env file we copied earlier in your favorite text editor:
# On macOS/Linux:
nano .env
# On Windows:
notepad .env
Add your API key:
# Required: OpenAI API Key
OPENAI_API_KEY=sk-your-key-here

# Optional: Add backup providers
# ANTHROPIC_API_KEY=sk-ant-your-key-here
# GROQ_API_KEY=gsk-your-key-here

# Optional: Configure default model
DEFAULT_MODEL=gpt-5-turbo
⚠️ Security Alert: Never commit your
.envfile to Git. The repository’s.gitignoreshould already exclude it, but double-check. Exposing API keys can lead to unexpected charges if someone uses your key.
Alternative: The Privacy-First Local Setup (Llama 4)
If you’re concerned about data privacy or want to eliminate API costs, 2026 is the year of local agents. You can now run AutoGPT using Llama 4, which was officially launched by Meta in early 2025, or Mistral 3 on your own hardware.
- Install Ollama: Download from the official Ollama website.
- Pull Llama 4: Run
ollama run llama4in your terminal. - Configure AutoGPT: In your
.envfile, set the provider to local:INTEGRATION_LOCAL_LLM=true LOCAL_LLM_ENDPOINT=http://localhost:11434/v1 DEFAULT_MODEL=llama4
Running AutoGPT with a local LLM is ideal for processing sensitive internal documents or for long-running research tasks that would otherwise cost hundreds of dollars in API credits. Just ensure you have at least 16GB of VRAM for the best performance.
Setting Spending Limits
This is non-negotiable. Before running any agent:
- Go to OpenAI Dashboard → Settings → Billing → Limits
- Set a “Hard limit” (I recommend $5-$10 for learning)
- Set a “Soft limit” at 80% of your hard limit to get warnings
- Enable email alerts for usage
I once forgot to set limits during testing and racked up a $47 bill overnight. Learn from my mistake.
Step 3: Build Your First Agent
Now the fun part. Let’s create an agent that actually does something useful.
Launch the Platform
In your terminal (with the virtual environment activated):
# Start the AutoGPT Platform
python -m autogpt platform
You should see output indicating the server is running, usually on http://localhost:8000. Open that URL in your browser.
Creating Your First Workflow
You’ll see a visual workflow builder. Here’s how to build a research agent:
- Click “New Agent” or the plus icon
- Name your agent: “MarketResearchBot”
- Select “Start from scratch” (we’ll use templates later)
Building the Workflow
You’ll see a canvas with a sidebar of available blocks. Let’s build a simple research agent:
Step 1: Add Input Block
- Drag “Input” from the sidebar to the canvas
- Configure: Label = “Research Topic”
- Placeholder = “Enter topic to research”
Step 2: Add AI Text Generator Block
- Drag “AI Text” to the canvas
- Connect the Input block’s output to the AI block’s “Prompt” input
- Configure:
- Model: “gpt-5-turbo”
- System Prompt: “You are a research assistant. Provide comprehensive, factual information with sources when possible.”
- Temperature: 0.7 (balances creativity and accuracy)
Step 3: Add Output Block
- Drag “Output” to the canvas
- Connect AI block’s output to Output block
- Configure: Label = “Research Report”
Step 4: Configure the Agent
- Click the gear icon on your workflow
- Set Max Iterations: 10 (prevents runaway loops)
- Enable Web Search: Checked
- Set Timeout: 300 seconds (5 minutes)
Testing Your Agent
- Save the workflow (Ctrl+S or Save button)
- Enter a test topic: “Latest trends in AI agent frameworks 2026”
- Click “Run”
- Watch the magic happen
The agent will:
- Plan research subtasks
- Search the web for current information
- Compile findings into a structured report
- Present the output
Your first run might take 1-3 minutes depending on complexity. You’ll see real-time updates showing each step the agent takes.
Recipe: Autonomous Competitor Analysis Agent
One of the most powerful long-tail use cases for AutoGPT is Autonomous Competitor Analysis. Instead of manually checking websites, you can build an agent that does it for you every morning.
The Workflow Blueprint:
- Search Block: Query for “Top 5 competitors in [Your Niche] 2026”.
- Scraper Block: Visit each competitor’s homepage and pricing page.
- Analysis Block (GPT-5): “Identify their core value proposition, pricing tiers, and any new features launched in the last 6 months.”
- CSV Writer Block: Save findings to a structured file.
By focusing your agent on specific SEO research tasks like “finding long-tail keyword opportunities in competitor headers,” you turn a generic AI into a specialized growth engine.
Understanding the Results
The output will include:
- Executive Summary: High-level findings
- Key Trends: Bullet points of major developments
- Sources: Links to referenced materials
- Recommendations: Actionable intelligence and insights you can use immediately.
Not bad for something you built in 20 minutes, right?
Understanding the Agent Loop
To use AutoGPT effectively, you need to understand what happens under the hood. The agent isn’t just calling an API repeatedly—it’s running a sophisticated decision loop based on Chain of Thought (CoT) reasoning.
The Four Steps of Autonomy
┌─────────────┐     ┌──────────────┐     ┌──────────────┐     ┌──────────────┐
│   PLANNING  │────▶│   ACTION     │────▶│ OBSERVATION  │────▶│  REFLECTION  │
│             │     │              │     │              │     │              │
│ Break goal  │     │ Execute      │     │ Review       │     │ Update       │
│ into tasks  │     │ using tools  │     │ results      │     │ strategy     │
└─────────────┘     └──────────────┘     └──────────────┘     └──────┬───────┘
       ▲───────────────────────────────────────────────────────────────┘
1. Planning: The agent analyzes your goal and breaks it into subtasks. This is where the agent maps out its internal “thought process.”
2. Action: The agent executes the planned task using available tools. This could be web search, file operations, or API calls.
3. Observation: The agent reviews the results. Did the search return relevant info? Is the data trustworthy?
4. Reflection: Based on observations, the agent decides next steps. This self-correction mechanism is what allows the agent to recover from failures or adjust its strategy if the initial plan was flawed.
This loop continues until:
- The goal is achieved
- Maximum iterations reached (safety limit)
- An error occurs
- The agent determines it cannot complete the task
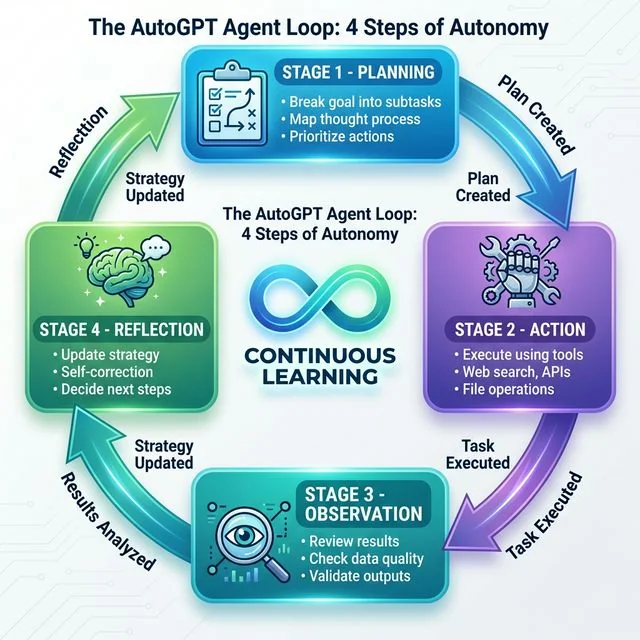 The AutoGPT Agent Loop: Four-step autonomous cycle of Planning (breaking goals into subtasks), Action (executing with tools and APIs), Observation (reviewing and validating results), and Reflection (updating strategy). This continuous learning loop with self-correction enables true autonomy in AI agents.
How It Differs from Simple Chains
You might be thinking, “Can’t I just chain prompts together?” Yes, but here’s the difference:
- Prompt chains are predetermined. Step A always leads to Step B.
- Agent loops are adaptive. If Step A fails, the agent tries a different approach.
This adaptability is what makes agents powerful—and sometimes unpredictable. To dive deeper into these patterns, see our guide on AI agent code patterns for building robust systems.
Memory and Context
AutoGPT maintains two types of memory, which is essential for effective State Management across long-running tasks:
Short-term: The current conversation and recent actions (limited by context window)
Long-term: Stored in files or databases, persists between sessions
This memory allows agents to:
- Reference earlier findings
- Learn from previous attempts
- Maintain continuity across long tasks. Learn more about AI agent memory systems to optimize your builds.
Customizing Agent Behavior
The basic agent is just the beginning. Let’s explore how to make it truly yours.
System Prompts and Personality
The system prompt defines your agent’s behavior. Think of it as the agent’s job description. By providing a detailed system prompt, you move the model beyond simple zero-shot performance into a specialized role. You can even include examples of past successes—a technique known as few-shot prompting—to dramatically increase the agent’s reliability.
Here’s an effective research assistant prompt:
You are an expert research analyst specializing in technology trends.
Your task is to conduct thorough, unbiased research and present findings
in a structured format.

Guidelines:
- Always cite sources with URLs
- Distinguish between facts and opinions
- Highlight conflicting information when found
- Use clear headings and bullet points
- Suggest 2-3 follow-up research directions
Experiment with different personalities:
- Skeptical Analyst: Questions assumptions, demands evidence
- Creative Explorer: Connects disparate ideas, suggests novel angles
- Executive Summarizer: Brief, actionable, focused on business implications
Adding Custom Tools
AutoGPT Platform supports custom tool integrations. Here’s how to add web search:
- In your workflow, click “Add Block”
- Select “Web Search” from the Tools category
- Configure the search parameters:
- Search engine: Google or Bing API
- Max results: 5-10
- Region: Your target market
For advanced users, you can create custom Python blocks:
# Example: Custom data processing block
def process_research_data(raw_data):
    """Clean and structure research findings"""
    structured = {
        'sources': [],
        'key_points': [],
        'confidence_score': 0.0
    }
    # Your processing logic here
    return structured
Memory Configuration
Adjust how your agent remembers information:
Context Window Management:
- Set max tokens per conversation (default: 4000)
- Configure summarization thresholds
- Enable smart context compression
Long-term Storage:
- File-based: JSON or Markdown files
- Database: SQLite or PostgreSQL for advanced use
- Vector store: For semantic search capabilities
Output Formatting
Control how results are presented:
- Structured JSON: For programmatic processing
- Markdown Reports: For human reading
- CSV Tables: For data analysis
- Custom Templates: Define your own formats
Iteration Limits and Timeouts
Always set guardrails:
Max Iterations: 10-20 (prevents infinite loops)
Timeout: 300-600 seconds (prevents hanging)
Cost Limit: $1-5 per run (prevents billing surprises)
These aren’t just recommendations—they’re lessons learned from agents that ran amok.
Cost Considerations & API Usage
Let’s talk money. Understanding costs upfront prevents unpleasant surprises.
OpenAI API Pricing (Current Rates)5
| Model | Input Cost | Output Cost |
|---|---|---|
| GPT-5 Turbo | $0.01 / 1K tokens | $0.03 / 1K tokens |
| GPT-5 | $0.03 / 1K tokens | $0.06 / 1K tokens |
| GPT-4o-mini | $0.00015 / 1K tokens | $0.0006 / 1K tokens |
What are tokens? Roughly, 1 token = 0.75 words. A paragraph might be 100-200 tokens.
Real Cost Examples
| Task Type | Tokens Used | Cost (GPT-5 Turbo) |
|---|---|---|
| Quick search + summary | 3,000 | $0.12 |
| Detailed research report | 15,000 | $0.60 |
| Multi-source analysis | 50,000 | $2.00 |
| Extended iterative task | 200,000 | $8.00 |
Factors Affecting Cost
- Model Choice: GPT-5 is 10x more expensive than mini models but significantly more capable
- Iteration Count: More loops = more API calls = higher costs
- Task Complexity: Research tasks cost more than simple Q&A
- Web Search: Each search adds tokens and API calls
Cost Optimization Tips
Use the right model for the job:
- Simple tasks → GPT-4o-mini
- Complex reasoning → GPT-5 Turbo
- Specialized logic → GPT-5
Set hard limits:
- Configure max tokens per request
- Limit iterations per agent run
- Set daily spending caps
Monitor usage:
- Check OpenAI dashboard weekly
- Review which agents use the most tokens
- Optimize high-cost workflows
Consider alternatives:
- Groq offers faster, cheaper inference for some tasks
- Local models (Llama, Mistral) for privacy-sensitive work
- Anthropic Claude for different reasoning patterns
Monitoring Your Usage
Track spending in real-time:
- OpenAI Dashboard → Usage
- Set up alerts at 50%, 80%, 100% of budget
- Review which models and agents consume the most
- Export usage data for analysis
I review my usage every Sunday. It takes 5 minutes and has saved me from several costly mistakes.
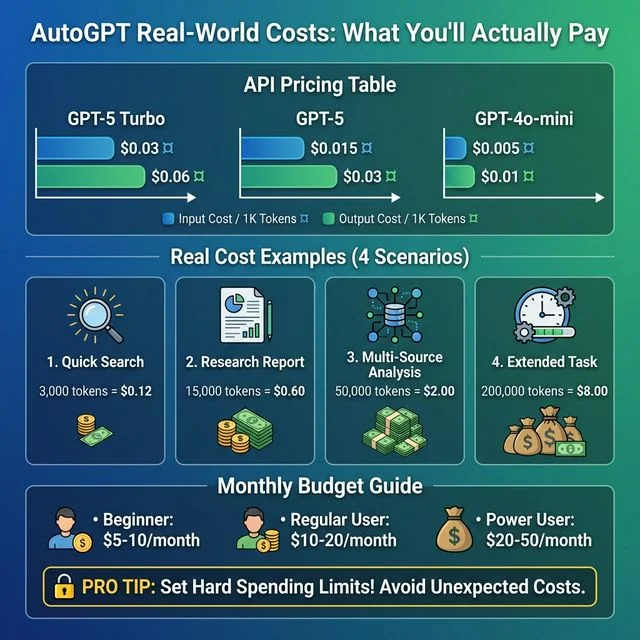 AutoGPT Real-World Costs: Complete breakdown of GPT-5 Turbo, GPT-5, and GPT-4o-mini API pricing per 1K tokens. Includes 4 realistic cost scenarios from quick searches ($0.12) to extended tasks ($8.00), plus monthly budget recommendations for beginners ($5-10), regular users ($10-20), and power users ($20-50). Pro tip: Always set hard spending limits to avoid unexpected costs.
Troubleshooting Common Issues
Even with the best setup, things go wrong. Here’s how to fix the most common problems.
Installation Errors
Problem: ModuleNotFoundError or import errors
Cause: Dependencies not installed correctly
Solution:
pip install -r requirements.txt --force-reinstall
# Or with specific Python version:
python3.11 -m pip install -r requirements.txt
Problem: Python version errors Cause: Running Python < 3.10 Solution:
# Check version
python --version

# If needed, install Python 3.11
# On macOS: brew install python@3.11
# On Ubuntu: sudo apt install python3.11
# On Windows: Download from python.org
Problem: Port already in use Cause: Another service using port 8000 Solution:
# Find and kill process using port 8000
lsof -ti:8000 | xargs kill -9
# Or change AutoGPT port in settings
API Key Issues
Problem: AuthenticationError or “Invalid API key”
Cause: Key not set correctly or invalid key
Solution:
# Verify .env file exists and contains key
cat .env | grep OPENAI

# Test key directly
curl https://api.openai.com/v1/models \
  -H "Authorization: Bearer your-key-here"
Problem: Rate limit errors (429 errors) Cause: Too many requests too quickly Solution:
- Add delays between requests
- Implement exponential backoff
- Upgrade OpenAI tier for higher limits
Problem: Insufficient quota Cause: Out of API credits or spending limit hit Solution:
- Check OpenAI billing dashboard
- Add payment method or increase limit
- Wait for next billing cycle
Advanced Debugging: Breaking the “Infinite Loop”
One of the most frequent search queries is “AutoGPT stuck in loop fix.” This usually happens because the agent’s goal is too broad or a tool keeps returning the same error.
How to fix it:
- Narrow the Scope: Instead of “Research AI,” use “List 5 specific AI frameworks for Python released in 2026.”
- Add Reflection Blocks: In the visual builder, insert a block that asks the agent to review its current progress against the final goal every 3 iterations.
- Check Tool Permissions: If the agent is stuck trying to write a file, verify the directory exists and the agent has write access.
- Lower Temperature: A high temperature can cause the agent to “hallucinate” new subtasks that aren’t necessary. Drop it to 0.3 for technical workflows.
Agent Behavior Problems
Problem: Infinite loops Cause: Agent can’t determine task completion Solution:
- Reduce max iterations to 5-10 for testing
- Add explicit completion criteria to goal
- Review agent logs to understand loop cause
Problem: Hallucinations or false information Cause: Model generating plausible-sounding but incorrect content Solution:
- Lower temperature setting (0.3-0.5)
- Enable fact-checking steps
- Require source citations
- Use web search to ground responses
Problem: Agent not using tools Cause: Tools not configured or agent not instructed to use them Solution:
- Verify tool is enabled in workflow
- Explicitly tell agent to use tools in system prompt
- Check tool permissions and API keys
Problem: Tasks taking too long Cause: Complex task, slow API responses, or inefficient workflow Solution:
- Break task into smaller subtasks
- Use faster models (GPT-4o-mini) for simple steps
- Enable parallel execution where possible
- Check internet connection speed
Performance Issues
Problem: Slow response times Cause: Large context windows, complex reasoning, or API latency Solution:
- Reduce max tokens per request
- Use GPT-4o-mini for simpler subtasks
- Implement response caching
- Consider Groq for faster inference
Problem: Memory errors Cause: System running out of RAM Solution:
- Close other applications
- Reduce batch sizes
- Enable memory optimization in settings
- Upgrade RAM if consistently hitting limits
Problem: Browser interface not loading Cause: Frontend build issues or port conflicts Solution:
# Rebuild frontend
cd frontend
npm install
npm run build

# Or use Docker which handles this automatically
AutoGPT vs Alternatives
AutoGPT isn’t the only autonomous agent framework. Here’s how it stacks up against alternatives.
AgentGPT
What it is: A web-based interface for creating AI agents without local installation.
Pros:
- No setup required—runs in browser
- Beginner-friendly visual interface
- Quick experimentation
Cons:
- Limited customization options
- Requires internet connection
- Less control over agent behavior
- Freemium model with limits
Best for: Quick experiments, beginners, or users who don’t want to manage infrastructure
When to choose: If you want to try autonomous agents without any technical setup
BabyAGI
What it is: A simpler task-management-focused agent system created by Yohei Nakajima.
Pros:
- Minimal codebase (fewer than 200 lines)
- Easy to understand and modify
- Focused on task prioritization
- Great for learning agent concepts
Cons:
- Less feature-rich than AutoGPT
- No built-in web interface
- Requires more manual configuration
- Smaller community
Best for: Learning agent architecture, simple task automation, customization enthusiasts
When to choose: If you want to understand how agents work at a fundamental level or need a simple, hackable system
For a detailed comparison of these autonomous agent frameworks, see our comprehensive BabyAGI vs AutoGPT vs AgentGPT guide covering features, setup, costs, and use cases.
LangChain Agents
What it is: A comprehensive framework for building LLM applications, including agents.
Pros:
- Extremely flexible and powerful
- Large ecosystem of integrations
- Production-ready patterns
- Strong community and documentation
- Supports multiple LLM providers
Cons:
- Steeper learning curve
- More code required
- Can be overkill for simple use cases
Best for: Production applications, complex workflows, developers building AI-powered products
When to choose: If you’re building a commercial product or need maximum flexibility
Comparison Matrix
| Feature | AutoGPT | AgentGPT | BabyAGI | LangChain |
|---|---|---|---|---|
| Setup Difficulty | Medium | Easy | Easy | Hard |
| Customization | High | Low | Medium | Very High |
| Web Interface | Yes (Platform) | Yes | No | Optional |
| Best For | Research & automation | Quick experiments | Learning | Production apps |
| Cost | API-based | Freemium | API-based | Variable |
| Learning Curve | Moderate | Low | Low | Steep |
| Community | Large | Growing | Small | Very Large |
My Recommendations
Choose AutoGPT if:
- You want a visual workflow builder
- You need built-in tools (search, file operations)
- You prefer open-source with active development
- You’re comfortable with moderate technical setup
Choose AgentGPT if:
- You want to try agents immediately
- You don’t need deep customization
- You prefer managed/cloud solutions
Choose BabyAGI if:
- You’re learning how agents work
- You want minimal, understandable code
- You enjoy customizing from scratch
Choose LangChain if:
- You’re building production applications
- You need maximum flexibility
- You want extensive integrations
Honestly? I use all four depending on the project. AutoGPT for research workflows, LangChain for client projects, BabyAGI when teaching, and AgentGPT for quick demos.
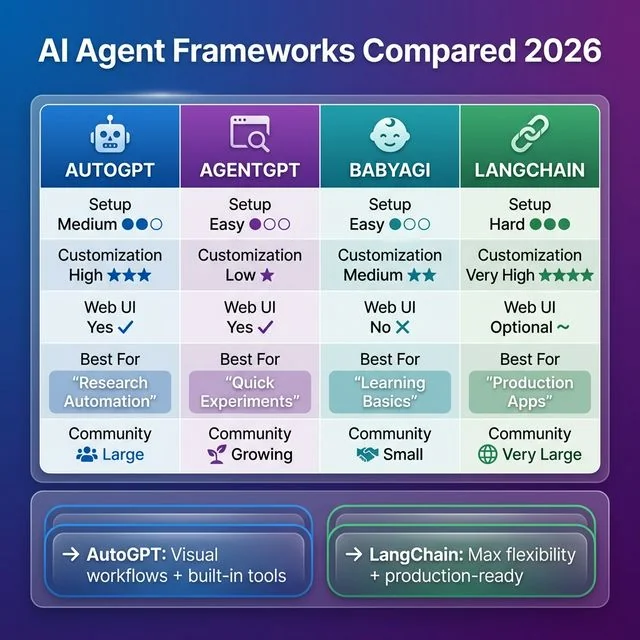 AI Agent Frameworks Compared 2026: Comprehensive comparison of AutoGPT (medium setup, high customization, visual workflows), AgentGPT (easy setup, quick experiments), BabyAGI (simple for learning), and LangChain (production-ready, maximum flexibility). Choose AutoGPT for research automation with built-in tools, or LangChain for production apps requiring max flexibility.
Scaling Up: Multi-Agent Orchestration (AutoGPT + CrewAI)
As you advance, you’ll find that a single agent has its limits. The 2026 trend is Multi-Agent Orchestration, identified by Gartner as a top strategic technology trend for the year 5.
Instead of one agent doing everything, you use AutoGPT as a “Worker” in a larger team managed by frameworks like CrewAI or OpenAI Swarms.
- Manager Agent (CrewAI): Assigns tasks and reviews results.
- Researcher Agent (AutoGPT): Scours the web for data.
- Writer Agent (GPT-5): Drafts the final report based on researcher’s findings.
This hierarchical approach dramatically reduces errors and allows for massive scaling. If you’re deciding between frameworks, see our AutoGPT vs CrewAI comparison.
Bonus: Deploy Your Agent as a Telegram Bot
Want to make your AutoGPT agent accessible from anywhere? Deploying it as a Telegram bot is one of the most practical ways to interact with your autonomous agent on the go. This section covers everything you need to know about creating AI-powered Telegram bots, from simple integrations to advanced features.
Why Telegram for AI Bots?
Telegram offers several advantages as an interface for autonomous AI agents:
- Universal Access: Available on mobile, desktop, and web
- Rich Interface: Support for buttons, inline queries, file sharing
- Free API: No charges for bot messages (you only pay for AI API calls)
- Privacy-Focused: End-to-end encryption for secret chats
- Group Support: Deploy agents in team channels
- No App Store Approval: Deploy instantly without review processes
Telegram’s Bot API is an HTTP-based interface for building bots6. This means you can use any programming language that supports HTTP requests to interact with Telegram’s messaging platform.
Option 1: Simple Telegram AI Bot (Beginner-Friendly)
If you want a straightforward AI chatbot without the full complexity of AutoGPT, here’s a complete implementation using Python and the OpenAI API:
Step 1: Set Up Your Bot with BotFather
- Open Telegram and search for @BotFather7
- Start a chat and send
/newbot - Follow prompts to name your bot (e.g., “My AI Assistant”)
- Choose a username ending in “bot” (e.g., “my_ai_helper_bot”)
- Save the API token BotFather provides—you’ll need it
Step 2: Install Required Libraries
pip install python-telegram-bot openai python-dotenv
```[^6]

#### Step 3: Create the Bot Code

Create a file named `telegram_ai_bot.py`:

```python
import os
import logging
from dotenv import load_dotenv
from telegram import Update
from telegram.ext import (
    Application,
    CommandHandler,
    MessageHandler,
    filters,
    ContextTypes,
    ConversationHandler
)
import openai

# Load environment variables
load_dotenv()

# Configure logging
logging.basicConfig(
    format='%(asctime)s - %(name)s - %(levelname)s - %(message)s',
    level=logging.INFO
)
logger = logging.getLogger(__name__)

# Constants
ASKING = 1

# Initialize OpenAI
openai.api_key = os.getenv('OPENAI_API_KEY')

async def start(update: Update, context: ContextTypes.DEFAULT_TYPE):
    """Send welcome message when /start is issued"""
    welcome_text = """
🤖 Welcome to your AI Assistant!

I'm powered by GPT-5 and can help you with:
• Answering questions
• Writing and editing
• Research and analysis
• Brainstorming ideas
• Coding help

Simply send me a message to get started!

Commands:
/start - Show this message
/help - Get usage tips
/reset - Clear conversation history
    """
    await update.message.reply_text(welcome_text)

async def help_command(update: Update, context: ContextTypes.DEFAULT_TYPE):
    """Send help message"""
    help_text = """
💡 Tips for best results:

• Be specific in your questions
• Use /reset to start fresh if context gets confusing
• For complex tasks, break them into smaller steps
• I remember our conversation until you use /reset

Privacy: Your messages are processed via OpenAI's API.
Don't share sensitive personal information.
    """
    await update.message.reply_text(help_text)

async def reset(update: Update, context: ContextTypes.DEFAULT_TYPE):
    """Clear conversation history"""
    context.user_data.clear()
    await update.message.reply_text("🔄 Conversation history cleared! Ready for new topics.")

async def handle_message(update: Update, context: ContextTypes.DEFAULT_TYPE):
    """Process user messages with OpenAI"""
    user_message = update.message.text
    user_id = update.effective_user.id

    # Show typing indicator
    await context.bot.send_chat_action(
        chat_id=update.effective_chat.id,
        action='typing'
    )

    # Initialize conversation history if not exists
    if 'messages' not in context.user_data:
        context.user_data['messages'] = [
            {
                "role": "system",
                "content": "You are a helpful AI assistant. Be concise but thorough. "
                          "If you're unsure about something, say so."
            }
        ]

    # Add user message to history
    context.user_data['messages'].append(
        {"role": "user", "content": user_message}
    )

    try:
        # Call OpenAI API
        response = openai.ChatCompletion.create(
            model="gpt-5-turbo",  # Use gpt-5 for better quality
            messages=context.user_data['messages'],
            max_tokens=1000,
            temperature=0.7
        )

        ai_response = response.choices[0].message.content

        # Add AI response to history
        context.user_data['messages'].append(
            {"role": "assistant", "content": ai_response}
        )

        # Send response (Telegram has 4096 char limit per message)
        if len(ai_response) > 4000:
            # Split long messages
            for i in range(0, len(ai_response), 4000):
                await update.message.reply_text(ai_response[i:i+4000])
        else:
            await update.message.reply_text(ai_response)

    except Exception as e:
        logger.error(f"Error processing message: {e}")
        await update.message.reply_text(
            "❌ Sorry, I encountered an error. Please try again or use /reset if issues persist."
        )

def main():
    """Start the bot"""
    # Get bot token from environment
    bot_token = os.getenv('TELEGRAM_BOT_TOKEN')

    if not bot_token:
        logger.error("TELEGRAM_BOT_TOKEN not found in environment variables!")
        return

    # Create application
    application = Application.builder().token(bot_token).build()

    # Add handlers
    application.add_handler(CommandHandler("start", start))
    application.add_handler(CommandHandler("help", help_command))
    application.add_handler(CommandHandler("reset", reset))
    application.add_handler(
        MessageHandler(filters.TEXT & ~filters.COMMAND, handle_message)
    )

    # Start bot
    logger.info("Bot is starting...")
    application.run_polling(allowed_updates=Update.ALL_TYPES)

if __name__ == '__main__':
    main()
Step 4: Configure Environment Variables
Create a .env file:
TELEGRAM_BOT_TOKEN=your_telegram_bot_token_here
OPENAI_API_KEY=your_openai_api_key_here
Step 5: Run Your Bot
python telegram_ai_bot.pyYour bot is now live! Search for it by username in Telegram and start chatting. For a more detailed walkthrough, check out our Telegram AI bot guide.
Option 2: Connect AutoGPT to Telegram (Advanced)
For integrating your full AutoGPT agent with Telegram, you have two approaches:
Approach A: Webhook Integration
Set up AutoGPT to send results to a Telegram webhook:
import requests
import os

TELEGRAM_BOT_TOKEN = os.getenv('TELEGRAM_BOT_TOKEN')
TELEGRAM_CHAT_ID = os.getenv('TELEGRAM_CHAT_ID')

def send_to_telegram(message):
    """Send AutoGPT output to Telegram"""
    url = f"https://api.telegram.org/bot{TELEGRAM_BOT_TOKEN}/sendMessage"
    payload = {
        'chat_id': TELEGRAM_CHAT_ID,
        'text': message[:4096],  # Telegram message limit
        'parse_mode': 'Markdown'
    }
    response = requests.post(url, json=payload)
    return response.json()

# Use in your AutoGPT workflow to send updates
# send_to_telegram("Research complete! Here are the findings...")
Approach B: Telegram as Trigger
Use Telegram messages to trigger AutoGPT tasks:
# In your Telegram bot handler
def handle_autogpt_task(update: Update, context: ContextTypes.DEFAULT_TYPE):
    """Trigger AutoGPT agent from Telegram command"""
    task = ' '.join(context.args)

    if not task:
        await update.message.reply_text(
            "Please provide a task. Example: /autogpt Research AI trends 2026"
        )
        return

    await update.message.reply_text(f"🤖 Starting task: {task}\nThis may take a few minutes...")

    # Trigger your AutoGPT agent here
    # result = run_autogpt_task(task)

    # For now, simulate with direct GPT call
    response = openai.ChatCompletion.create(
        model="gpt-5",
        messages=[
            {"role": "system", "content": "You are an autonomous research agent."},
            {"role": "user", "content": task}
        ]
    )

    await update.message.reply_text(response.choices[0].message.content)
Telegram Bot vs Standalone AutoGPT
| Feature | Standalone AutoGPT | Telegram Bot |
|---|---|---|
| Access | Desktop/web only | Mobile + Desktop |
| Setup Complexity | Medium | Low |
| User Interface | Visual workflow builder | Chat interface |
| Real-time Updates | Dashboard view | Push notifications |
| Group Collaboration | Limited | Native support |
| Cost | API costs only | API costs only (Telegram is free) |
| Customization | High (visual blocks) | Medium (code-based) |
| Best For | Complex workflows | Quick queries, mobile access |
Advanced Telegram Bot Features
Once you have the basics working, consider adding these features:
Inline Mode for Quick Queries
from telegram import InlineQueryResultArticle, InputTextMessageContent

async def inline_query(update: Update, context: ContextTypes.DEFAULT_TYPE):
    """Handle inline queries (@YourBot query)"""
    query = update.inline_query.query

    if not query:
        return

    # Quick AI response for inline queries
    response = openai.ChatCompletion.create(
        model="gpt-4o-mini",
        messages=[{"role": "user", "content": query}],
        max_tokens=200
    )

    results = [
        InlineQueryResultArticle(
            id='1',
            title='AI Response',
            input_message_content=InputTextMessageContent(
                f"Q: {query}\n\nA: {response.choices[0].message.content}"
            )
        )
    ]

    await update.inline_query.answer(results)

# Add handler
application.add_handler(InlineQueryHandler(inline_query))
File Processing
async def handle_document(update: Update, context: ContextTypes.DEFAULT_TYPE):
    """Process uploaded documents"""
    document = update.message.document

    # Download file
    file = await context.bot.get_file(document.file_id)
    file_path = f"downloads/{document.file_name}"
    await file.download_to_drive(file_path)

    await update.message.reply_text(
        f"📄 Received: {document.file_name}\n"
        f"Processing with AutoGPT..."
    )

    # Process with your agent
    # result = process_document_with_autogpt(file_path)
Voice Message Support
async def handle_voice(update: Update, context: ContextTypes.DEFAULT_TYPE):
    """Process voice messages"""
    voice = update.message.voice

    # Download voice file
    file = await context.bot.get_file(voice.file_id)
    voice_path = "voice_message.ogg"
    await file.download_to_drive(voice_path)

    # Transcribe with Whisper
    with open(voice_path, 'rb') as audio:
        transcript = openai.Audio.transcribe("whisper-1", audio)

    # Process transcribed text
    await update.message.reply_text(
        f"🎤 You said: {transcript.text}\nProcessing..."
    )

    # Send to AI for response
    # ... handle as regular message
Deployment Options
Local Development (Testing)
python telegram_ai_bot.pyHeroku (Free Tier Available)
Create a Procfile:
worker: python telegram_ai_bot.pyCreate requirements.txt:
python-telegram-bot
openai
python-dotenv
Deploy:
heroku create your-bot-name
git push heroku main
heroku config:set TELEGRAM_BOT_TOKEN=your_token
heroku config:set OPENAI_API_KEY=your_key
Railway/Render (Simple Hosting)
Both platforms offer generous free tiers:
- Connect your GitHub repository
- Set environment variables in dashboard
- Deploy automatically on git push
Self-Hosted (VPS)
For production use:
# Use systemd to keep bot running
sudo nano /etc/systemd/system/telegram-bot.service
[Unit]
Description=Telegram AI Bot
After=network.target
[Service]
Type=simple
User=ubuntu
WorkingDirectory=/home/ubuntu/bot
Environment=TELEGRAM_BOT_TOKEN=your_token
Environment=OPENAI_API_KEY=your_key
ExecStart=/usr/bin/python3 /home/ubuntu/bot/telegram_ai_bot.py
Restart=always
[Install]
WantedBy=multi-user.targetCost Comparison: Telegram Bot
Running a Telegram AI bot has different cost considerations:
| Component | Cost | Notes |
|---|---|---|
| Telegram API | Free | No charges for bot messages6 |
| OpenAI API | $0.002-0.06 per 1K tokens | Same as AutoGPT8 |
| Hosting | $0-5/month | Free tiers available (Heroku9, Railway10) |
| Total Monthly | $5-25 | Depends on usage |
Cost Optimization:
- Use GPT-4o-mini for simple conversations ($0.00015/1K tokens)
- Reserve GPT-5 for complex research tasks
- Implement message length limits
- Cache frequent responses
Common Telegram Bot Issues
Problem: Bot doesn’t respond to messages Solution:
- Check BotFather to ensure bot isn’t stopped (/setprivacy → Disable)
- Verify TELEGRAM_BOT_TOKEN is correct
- Check logs for webhook/polling conflicts
Problem: “Conflict: can’t use getUpdates while webhook is active” Solution:
# Delete webhook first
curl -X POST "https://api.telegram.org/bot<TOKEN>/deleteWebhook"
Problem: Rate limiting (429 errors) Solution:
- Add delays between messages
- Implement message queuing
- Use exponential backoff
Problem: Messages too long (over 4096 characters) Solution:
def split_message(text, max_length=4000):
    """Split long messages into chunks"""
    return [text[i:i+max_length] for i in range(0, len(text), max_length)]

# Send in parts
for chunk in split_message(long_response):
    await update.message.reply_text(chunk)
Best Practices & Safety Tips
After months of working with autonomous agents, here are the lessons I’ve learned—often the hard way.
Essential Safety Practices
Always Set Iteration Limits
Never run an agent without a max iteration cap. Infinite loops are real and can burn through API credits fast.
Recommended: 5-10 iterations for testing, 20-50 for productionMonitor API Usage in Real-Time
Keep your OpenAI dashboard open when testing new agents. Watch for unexpected spikes.
Review Before Executing Destructive Actions
If your agent can:
- Delete files
- Send emails
- Make purchases
- Post to social media
Require explicit human confirmation. Never give autonomous agents unlimited destructive power.
Enterprise Guardrails: Human-in-the-Loop (HITL)
For high-value or high-risk tasks, you MUST implement Human-in-the-Loop (HITL) security. In the AutoGPT Platform visual builder, this is done by inserting a “Confirmation Block” before any tool execution that modifies data or spends money.
- The Flow: Agent plans action → Agent sends summary to human via Telegram/Web UI → Human clicks “Approve” → Agent executes.
This is the gold standard for “AutoGPT enterprise security guardrails” and prevents the “hallucination-driven spending” that haunts many new users.
Use Test Environments First
Always test new agents in a sandbox:
- Use dummy data
- Test with mini models (cheaper mistakes)
- Limit web access initially
- Review logs before scaling up
Keep API Keys Secure
- Never commit keys to version control
- Use environment variables
- Rotate keys regularly
- Monitor for unauthorized usage
Performance Best Practices
Start Simple, Then Scale
Don’t build a complex 20-step agent on day one. Start with 2-3 steps, verify it works, then add complexity. This incremental approach makes monitoring AI agent performance much easier, as you can isolate exactly which specific step is causing latency or reasoning errors before they compound.
Use the Right Model for Each Task
Not everything needs GPT-5:
- Simple Q&A → GPT-4o-mini
- Complex reasoning → GPT-5
- Creative writing → GPT-5
- Code generation → GPT-5 or Claude
Implement Smart Error Handling
Agents will fail. Plan for it:
- Add retry logic with exponential backoff
- Set fallback models
- Log errors for analysis
- Graceful degradation
Cache When Possible
If your agent frequently looks up the same information, cache it:
- Web search results
- API responses
- Computed data
Documentation and Organization
Document Your Workflows
Future you will thank present you:
- Comment your system prompts
- Document expected inputs/outputs
- Note any custom configurations
- Keep a changelog
Version Control Your Agents
Save different versions of successful agents:
agents/
├── research_bot_v1.json
├── research_bot_v2_improved.json
└── research_bot_v3_final.json
Maintain a Prompt Library
Keep a file of effective system prompts:
## Research Assistant
System prompt: ...
Best for: Market research, trend analysis
Notes: Works well with web search enabled

## Code Reviewer
System prompt: ...
Best for: Python code review
Notes: Use GPT-5 for best results
When NOT to Use AutoGPT
Autonomous agents aren’t always the right choice:
❌ Simple, one-step tasks → Use ChatGPT directly
❌ Tasks requiring 100% accuracy → Human review needed
❌ Highly regulated decisions → Compliance requirements
❌ Real-time applications → API latency is too slow
❌ Sensitive data processing → Consider local models
⚠️ Never let an agent access sensitive systems or data without human oversight. I’ve seen agents accidentally expose confidential information because they were given overly broad access.
Frequently Asked Questions
Do I need to know Python to use AutoGPT?
Short answer: Not for the Platform version.
The AutoGPT Platform provides a visual interface that doesn’t require coding. However, basic Python knowledge helps if you want to:
- Create custom tools
- Debug issues
- Modify the codebase
- Build advanced workflows
For the Classic version, Python knowledge is essential.
Can AutoGPT browse the internet?
Yes, but with important caveats.
AutoGPT can use web search and browser tools to:
- Search for information
- Read web pages
- Extract data from sites
However:
- Not all websites allow automated access
- JavaScript-heavy sites may not work well
- Rate limits apply to web scraping
- Some sites block automated browsers
How is AutoGPT different from ChatGPT?
Think of it this way:
ChatGPT is like a conversation partner. You ask, it responds. You guide every interaction.
AutoGPT is like hiring an assistant. You give a goal, it figures out how to achieve it, reports back when done.
Key differences:
- Autonomy: AutoGPT runs independently
- Tool use: AutoGPT can search, write files, call APIs
- Persistence: AutoGPT maintains memory across actions
- Cost: AutoGPT uses more tokens (higher cost)
Can I run AutoGPT for free?
No. While the software itself is free and open-source, running it requires:
- OpenAI API key (paid)
- Or alternative LLM API (usually paid)
- Compute resources (your machine)
There is no free tier that includes API access. Budget $5-20/month for casual use.
What tasks work best with AutoGPT?
Excellent use cases:
- Market research and competitive analysis
- Content research and summarization
- Data processing and cleaning
- Repetitive workflow automation
- Multi-step information gathering
Poor use cases:
- Simple Q&A (overkill)
- Real-time interactions (too slow)
- Tasks requiring perfect accuracy
- Creative writing (better tools exist)
Is AutoGPT suitable for production use?
Yes, with proper guardrails.
Production considerations:
- Set strict iteration limits
- Implement human-in-the-loop for critical decisions
- Monitor API costs closely
- Log all agent actions
- Have fallback systems
Many companies use AutoGPT for:
- Research automation
- Data processing pipelines
- Internal tooling
- Prototype development
How do I stop a runaway agent?
Emergency stops:
- Ctrl+C in the terminal
- Kill the process:
kill -9 [PID] - Revoke API key (nuclear option)
- Set spending limits (prevents this)
Prevention:
- Always set max iterations
- Use timeout limits
- Monitor in real-time
- Test with small tasks first
Can AutoGPT replace human workers?
Not entirely. AutoGPT augments human capabilities but doesn’t replace human judgment:
- Agents make mistakes and hallucinate
- They lack real-world context
- Ethical decisions need humans
- Creative strategy requires human insight
Think of AutoGPT as a very capable intern who needs supervision, not a replacement for experienced professionals.
What’s the difference between AutoGPT Classic and Platform?
| Classic | Platform | |
|---|---|---|
| Interface | Terminal/CLI | Visual web UI |
| Setup | Complex | Moderate |
| Customization | Code-based | Visual + code |
| Target users | Developers | Technical users |
| Status | Maintenance | Active development |
| Learning curve | Steep | Moderate |
This tutorial uses the Platform version as it’s the recommended path for new users.
How do I update AutoGPT?
# Navigate to repository
cd AutoGPT

# Pull latest changes
git pull origin master

# Update dependencies
pip install -r requirements.txt --upgrade

# Restart the platform
python -m autogpt platform
Always check the release notes for breaking changes before updating.
Can I use AutoGPT through Telegram?
Yes! You can deploy AutoGPT as a Telegram bot for mobile access and team collaboration. There are two approaches:
Option 1: Simple AI Bot
Build a Telegram bot using python-telegram-bot library that connects to OpenAI’s API. This gives you AI capabilities in Telegram without the full complexity of AutoGPT. See the “Bonus: Deploy Your Agent as a Telegram Bot” section above for complete code.
Option 2: Full AutoGPT Integration Connect your AutoGPT Platform workflows to Telegram using webhooks or polling. This requires:
- Setting up a Telegram bot via @BotFather
- Creating a webhook endpoint
- Routing messages between Telegram and AutoGPT
- Handling conversation state
Benefits of Telegram deployment:
- Access from mobile devices
- Share agents with team members
- Group chat support
- Free Telegram API (no message charges)
- Push notifications for agent updates
Cost: Same as regular AutoGPT usage—you pay for OpenAI API calls, Telegram is free.
How do I create a Telegram AI bot step by step?
Step 1: Message @BotFather on Telegram and send /newbot
Step 2: Choose a name and username for your bot
Step 3: Save the API token BotFather provides
Step 4: Install required libraries: pip install python-telegram-bot openai
Step 5: Write your bot code (see example in the Telegram section above)
Step 6: Set environment variables for your tokens
Step 7: Run your bot: python telegram_bot.py
Step 8: Search for your bot by username and start chatting
Time required: 15-30 minutes for a basic bot.
What’s the difference between webhook and polling for Telegram bots?11
Polling (easier for beginners):
- Bot constantly asks Telegram “any new messages?”
- Works behind firewalls and NAT
- Good for development and small projects
- Simpler setup
- Higher latency (checks every few seconds)
Webhook (better for production):
- Telegram sends messages to your server URL
- Instant message delivery
- More scalable
- Requires public server with HTTPS
- Needs port forwarding or cloud hosting
Recommendation: Start with polling for testing, switch to webhook for production deployment.
Can I run a Telegram bot for free?
Yes, mostly. Here’s the cost breakdown:
Free components:
- Telegram Bot API (unlimited messages)
- Hosting on Heroku free tier or Railway
- Python and libraries (open source)
Paid components:
- OpenAI API calls ($0.01-0.06 per 1K tokens)
- Domain name (optional, ~$10/year)
- VPS hosting (optional, if you outgrow free tiers)
Realistic monthly cost: $5-15 for light personal use, $20-50 for active business use.
Free hosting options:
- Heroku (550 free hours/month)
- Railway ($5 free credit monthly)
- PythonAnywhere (limited free tier)
- Self-hosted on Raspberry Pi (one-time hardware cost)
Is a Telegram AI bot better than standalone AutoGPT?
It depends on your use case:
Choose Telegram Bot when:
- You need mobile access
- Sharing with non-technical users
- Quick queries on the go
- Team collaboration in groups
- You prefer chat interface over visual builder
Choose Standalone AutoGPT when:
- Building complex multi-step workflows
- Need visual workflow debugging
- Processing large amounts of data
- Want full control over agent logic
- Running long-running autonomous tasks
Hybrid approach: Many users run AutoGPT on a server and interact with it through Telegram for convenience.
How much does a Telegram AI bot cost to run monthly?
Minimal usage (personal): $3-8/month
- OpenAI API: $3-5 (mini models)
- Hosting: $0-5 (free tier or cheap VPS)
Moderate usage (small team): $15-30/month
- OpenAI API: $10-20 (mix of mini and flagship models)
- Hosting: $5-10 (paid tier for reliability)
Heavy usage (business): $50-200/month
- OpenAI API: $40-180 (mostly GPT-5)
- Hosting: $10-20 (dedicated resources)
Cost optimization tips:
- Use GPT-4o-mini for simple conversations (10x cheaper)
- Implement conversation length limits
- Cache frequent responses
- Set daily spending caps
- Monitor usage weekly
What are the best use cases for Telegram AI bots?
Personal productivity:
- Quick research and summaries
- Writing assistance and editing
- Translation and language learning
- Note-taking and reminders
Business applications:
- Customer support automation
- FAQ handling and lead qualification
- Internal team knowledge base
- Meeting notes and action items
Content creation:
- Social media post generation
- Blog outline creation
- Email drafting
- Brainstorming ideas
Technical tasks:
- Code review and debugging help
- Documentation lookup
- API testing assistance
- Technical explanations
Collaboration:
- Group brainstorming sessions
- Shared research projects
- Team knowledge management
- Automated reporting
Do I need a server to host a Telegram bot?
For development: No—run locally on your computer For production: Yes—bot needs to be always online
Server options ranked by complexity:
- Easiest: Heroku, Railway, Render (managed, free tiers)
- Moderate: VPS (DigitalOcean, Linode, $5-10/month)
- Advanced: Self-hosted (Raspberry Pi, home server)
- Enterprise: AWS Lambda, Google Cloud Functions
My recommendation for beginners: Start with Railway or Heroku free tier. When you outgrow them (or want custom domains), move to a $5 DigitalOcean droplet.
Conclusion & Next Steps
Congratulations! You’ve built your first autonomous AI agent with AutoGPT, marking a major step in your journey to mastering essential AI skills.
Let’s recap what you accomplished:
- ✅ Installed AutoGPT Platform
- ✅ Configured API keys and safety limits
- ✅ Built a working research agent
- ✅ Understood the agent loop mechanics
- ✅ Learned to customize and troubleshoot
- ✅ Compared AutoGPT to alternatives
You now have a foundation to build upon. Here are suggested next steps:
Immediate next steps:
- Experiment with different agent types - Try a data processing agent or content analyzer
- Customize the research agent - Add more tools, refine the system prompt
- Set up monitoring - Track your API usage and agent performance
This week: 4. Build a multi-agent system - Have agents work together on complex tasks. 5. Explore the marketplace - Check out pre-built agents from the community 6. Join the community - The AutoGPT Discord is active and helpful
This month: 7. Integrate with your workflow - Connect AutoGPT to your existing tools 8. Build a custom tool - Extend AutoGPT with your own Python functions 9. Contribute back - Share your agents or improvements with the open-source community
Keep Learning
Autonomous AI is evolving rapidly. To stay current:
- Follow the AutoGPT GitHub repository
- Subscribe to AI newsletters
- Experiment regularly
- Share what you learn
What’s your next agent project? Whether it’s automating research, processing data, or exploring creative applications, you now have the tools to build it. Start small, iterate often, and don’t be afraid to break things—that’s how learning happens.
Happy building! 🤖
Have questions or built something cool? Share your experience in the comments below. And if you found this guide helpful, stay tuned for more automation tutorials.
References
Footnotes
-
Significant Gravitas. “AutoGPT: The Open-Source Autonomous AI Agent Framework.” GitHub, 2023-2026. https://github.com/Significant-Gravitas/AutoGPT - Official repository for the world’s most popular autonomous agent framework. ↩
-
DataCamp. “AutoGPT Tutorial: Creating And Deploying Autonomous AI Agents in 2026.” DataCamp, 2025. https://www.datacamp.com/tutorial/autogpt-guide - Comprehensive technical guide covering visual workflow configuration and deployment. ↩
-
McKinsey & Company. “The State of AI in 2025: Generative AI Adoption and the Rise of Autonomous Agents.” McKinsey QuantumBlack, 2025. https://www.mckinsey.com/capabilities/quantumblack/our-insights/the-state-of-ai - Research report detailing organizational experimentation with agentic workflows. ↩
-
OpenAI. “OpenAI Platform Pricing: Models, Tokens, and Usage Limits.” OpenAI Documentation, 2026. https://openai.com/pricing - Official cost breakdown for GPT-5 and GPT-4o-mini models used in autonomous loops. ↩
-
Gartner. “Gartner Identifies Top 10 Strategic Technology Trends for 2026.” Gartner Press Release, 2025. https://www.gartner.com/en/newsroom/press-releases/2025-10-21-gartner-identifies-top-10-strategic-technology-trends-for-2026 - Market analysis highlighting Multi-Agent Orchestration as a critical future technology. ↩ ↩2
-
Telegram. “Telegram Bot API: Official Developer Reference.” Telegram Documentation, 2026. https://core.telegram.org/bots/api - Technical specification for building bot interfaces on the Telegram platform. ↩ ↩2
-
Telegram. “Introduction to Bots: Using BotFather for Configuration.” Official Telegram Documentation, 2026. https://core.telegram.org/bots - Guide to creating and managing bot tokens and identities. ↩
-
OpenAI. “API Reference: Chat Completions and Agentic Workflows.” OpenAI Platform, 2026. https://platform.openai.com/docs/api-reference - Detailed documentation for implementing autonomous loops via OpenAI APIs. ↩
-
Heroku. “Heroku Dev Center: Getting Started with Python and Async Workers.” Heroku Documentation, 2026. https://devcenter.heroku.com/articles/getting-started-with-python - Official guide for deploying Python-based AI agents on cloud platforms. ↩
-
Railway. “Deploying Python Applications and AI Bots on Railway.” Railway Documentation, 2026. https://docs.railway.app/deploy/python - Infrastructure guide for hosting long-running autonomous bot processes. ↩
-
Telegram. “Marvin’s Marvellous Guide to All Things Webhook.” Official Telegram Documentation, 2026. https://core.telegram.org/bots/webhooks - Comparative analysis of webhook versus polling architectures for bot communication. ↩