
Ralph Wiggum AI Loop: The Viral Coding Technique Explained
Discover the Ralph Wiggum AI Loop technique that's revolutionizing iterative coding. Learn how this viral workflow uses persistent AI agents to debug.
Last week, I watched a developer fix 47 failing tests in 23 minutes. Not by frantically typing—by setting up a loop and letting an AI agent iterate until everything passed. When I asked what he called this technique, he grinned and said, “Ralph Wiggum loop.” I had no idea what that meant.
Turns out, I’d stumbled onto one of the most interesting developments in AI-assisted coding. The Ralph Wiggum technique isn’t just another prompt engineering trick—it’s a fundamental shift in how we think about working with AI agents. Instead of asking AI for an answer and hoping it’s right, you set up a persistent loop that keeps trying until it actually succeeds.
Here’s what makes this fascinating: it’s named after a cartoon character from The Simpsons. Ralph Wiggum, the kid who famously says “I’m helping!” while doing something completely wrong. But that’s exactly the point—Ralph keeps trying, keeps helping, never gives up. And that persistence, it turns out, is exactly what makes AI agents effective at complex coding tasks.
In this guide, I’ll walk you through everything I’ve learned about the Ralph Wiggum AI loop technique. You’ll discover what it is, how it works, when to use it (and when not to), and how to implement it yourself. I’ve tested this extensively over the past month, and I’m still surprised by what it can accomplish.
TL;DR - Quick Summary on Ralph Wiggum AI Loop
What is it? A persistent while loop that feeds prompts to an AI agent repeatedly until specific completion criteria are met (like “all tests pass”). Instead of one-shot AI responses, the agent iterates autonomously until it actually succeeds.
Key Benefits:
- ✅ Autonomous debugging and feature development
- ✅ Self-correcting iterations based on test feedback
- ✅ Works overnight (“AFK coding”) on well-defined tasks
- ✅ Reduces context switching and manual prompt refinement
Best For: Test-driven debugging, refactoring, dependency upgrades, linting fixes, UI iteration with tests
Not For: Ambiguous requirements, creative design, architecture decisions, security-critical code
Popular Tools: Claude Code, Cursor AI, Gemini CLI, Aider, Continue.dev, VS Code + Copilot
Quick Start: Define clear success criteria → Set up validation (tests/linting) → Run AI in loop → Monitor progress → Review results
📑 Jump to Section
Core Concepts:
Practical Guidance:
Implementation:
Advanced Topics:
Quick Reference:
What is the Ralph Wiggum AI Loop?
Let me start with the simplest explanation I can give: the Ralph Wiggum AI loop is a persistent while loop that feeds prompts to an AI agent repeatedly until specific completion criteria are met.
That probably sounds abstract, so here’s the key difference from normal AI prompting. When you ask Claude or GPT to fix a bug, it gives you an answer and stops. It might be right, might be wrong—but it’s done. The AI thinks it’s finished, so it moves on. With the Ralph loop, the AI doesn’t get to decide when it’s done. You define success criteria (like “all tests pass”), and the loop keeps running until those criteria are actually met.
I’ve seen this work in practice, and it’s genuinely different from how most developers use AI. When I first tried it, I was debugging a React component that had three failing tests. I gave Claude the error messages and asked it to fix them. It made changes. Two tests passed, one still failed. Normally, I’d read the new error, craft another prompt, paste it back in, and repeat. With the Ralph loop, all of that happens automatically. The AI sees the test still fails, analyzes the new error, tries a different approach, and keeps going until all three tests pass.
Why “Ralph Wiggum”?
The naming is brilliant, honestly. Ralph Wiggum is that character from The Simpsons who’s… well, not the sharpest tool in the shed. But he’s persistent. He keeps trying to help even when things go wrong. He embodies this “I’m helping!” energy that perfectly captures what an AI agent does in a loop.
Geoffrey Huntley, the developer who popularized this technique, described it plainly as “Ralph is a Bash loop.” That’s it. That’s the whole concept. But the meme branding is what made it stick. If Huntley had called it “Iterative AI Agent Workflow” or “Persistent Validation Loop,” nobody would remember it. But “Ralph Wiggum loop”? That’s memorable. That’s shareable. That’s the kind of name that spreads through developer communities like wildfire.
I’ve noticed this pattern before—technical concepts that get meme names tend to get adopted faster. “Rubber duck debugging” is more memorable than “verbal problem articulation.” “Yak shaving” beats “recursive task distraction.” The Ralph Wiggum loop fits right into that tradition.
The Core Loop Structure
At its heart, the technique is just a while loop. Here’s the basic structure:
while [ condition not met ]; do
  AI agent attempts task
  Validate output
  Feed results back to AI
  Increment iteration counter
done
Here’s a visual representation of how the Ralph loop works:
┌─────────────────────────────────────────────────────────────┐
│ START RALPH LOOP │
│ • Set max iterations (e.g., 20) │
│ • Define success criteria (e.g., "all tests pass") │
│ • Load initial context │
└────────────────────┬────────────────────────────────────────┘
│
▼
┌────────────────────────────┐
│ AI RECEIVES PROMPT │
│ + Previous Feedback │
└────────────┬───────────────┘
│
▼
┌────────────────────────────┐
│ AI GENERATES/MODIFIES │
│ CODE │
└────────────┬───────────────┘
│
▼
┌────────────────────────────┐
│ RUN VALIDATION │
│ • Tests │
│ • Linters │
│ • Build │
└────────────┬───────────────┘
│
┌───────────┴───────────┐
│ │
PASS ▼ FAIL ▼
┌────────────────┐ ┌────────────────────┐
│ All Criteria │ │ CAPTURE FEEDBACK │
│ Met? │ │ • Error messages │
└───┬────────┬───┘ │ • Stack traces │
│ │ │ • Test output │
YES │ │ NO └─────────┬──────────┘
│ │ │
│ └────────────────────┘
│ │
│ ▼
│ ┌──────────────────────┐
│ │ Iteration < Max? │
│ └──────┬───────┬───────┘
│ │ │
│ YES │ │ NO
│ │ │
│ ▼ ▼
│ ┌──────────────┐ ┌─────────────────┐
│ │ FEED BACK │ │ ❌ MAX REACHED │
│ │ TO AI AS │ │ Manual review │
│ │ CONTEXT │ │ needed │
│ └──────┬───────┘ └─────────────────┘
│ │
│ │ Increment
│ │ counter
│ │
│ └──────────┐
│ │
│ │
└────────────────┐ │
│ │
▼ │
┌────────────────────┐ │
│ ✅ SUCCESS! │ │
│ Review & Deploy │ │
└────────────────────┘ │
│
└─────► LOOP BACK TO TOP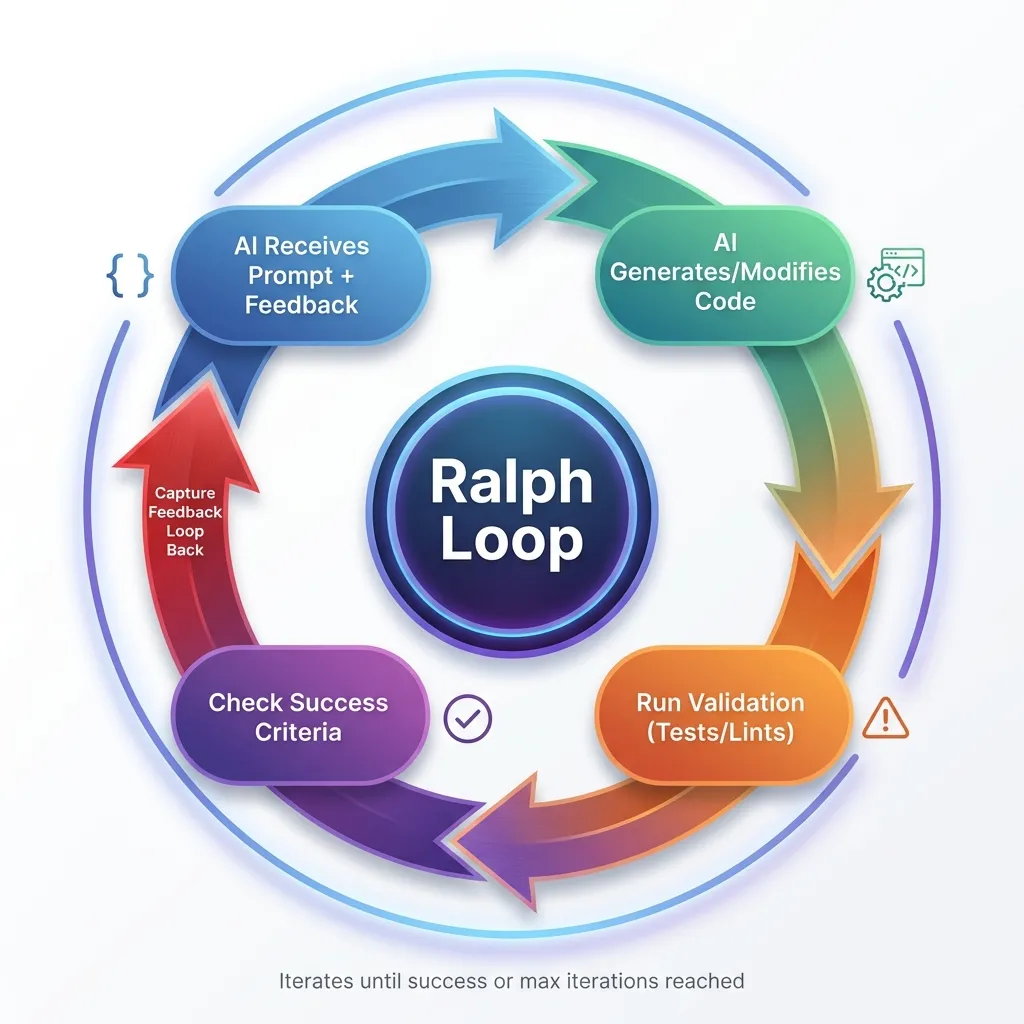 The Ralph Loop workflow: A continuous cycle of AI iteration, validation, and feedback until success criteria are met.
Key Points:
- Green path (left): Success - all validation passes and criteria met
- Orange path (middle): Feedback loop - capture errors and try again
- Red path (right): Failure - max iterations reached, needs manual review
The loop continues iterating, learning from each failure, until it either succeeds or hits the safety limit.
That’s it. Simple, right? But the implications are huge. Each iteration, the AI gets feedback about what worked and what didn’t. It learns from its mistakes—not in the machine learning sense, but in the practical sense of having error messages and test results to work with.
When I implemented my first Ralph loop, I was shocked by how much better the results were compared to manual iteration. The AI doesn’t get frustrated, doesn’t lose context (well, not until you hit token limits), and doesn’t make the same mistake twice if you feed it good error messages.
Key Characteristics
Let me break down what makes this technique work:
Persistent Iteration - The loop continues despite failures. This is crucial. Most AI tools give up after one attempt. The Ralph loop doesn’t know how to give up.
Self-Correction - Each iteration learns from previous attempts. The AI sees what failed, why it failed, and adjusts its approach. I’ve watched loops where iteration 1 fixes syntax errors, iteration 2 fixes logic errors, and iteration 3 handles edge cases. It’s like watching someone debug in fast-forward.
Clear Exit Criteria - You define specific, verifiable completion conditions. “All tests pass” is clear. “Make it better” is not. This is where a lot of people mess up their first attempts.
Safety Limits - Max iterations prevent infinite loops. I learned this the hard way when I forgot to set a limit and burned through $12 in API tokens before I noticed. Always set a max iteration count.
Feedback Integration - Test results, errors, and logs get fed back to the AI. This is the secret sauce. Without good feedback, the AI is just guessing randomly. With detailed error messages and test output, it can actually make progress.
If you’re interested in the foundational concepts of effective AI prompting that make this technique work, check out my guide on AI prompts for developers.
Origins & Timeline: How It Went Viral
The Ralph Wiggum technique is remarkably recent. I mean, we’re talking weeks old, not months or years. That’s part of what makes it so interesting—you’re reading about something that’s still actively evolving.
Creator: Geoffrey Huntley
Geoffrey Huntley is the developer who popularized this approach. When I first heard about the technique, I went looking for his original posts to understand where it came from. Huntley’s background is in developer tools and automation, which makes sense—this technique is all about automating the iteration process that developers normally do manually.
His description of the technique is wonderfully simple: “Ralph is a Bash loop.” That’s the entire explanation. No complex theory, no academic framework, just a Bash loop that keeps running until the task is done. I appreciate that kind of clarity.
What Huntley recognized is that AI agents were already good at individual tasks, but they gave up too easily. If you asked Claude to fix a bug and it didn’t work on the first try, you had to manually feed it the new error message and ask again. That’s tedious. Why not automate that tedium?
Timeline of Adoption
Here’s how this technique spread, based on what I’ve been able to piece together:
Late 2024: The concept emerges as developers experiment with iterative AI workflows. People were already doing this manually—running AI suggestions, checking if they worked, feeding errors back. Someone just needed to automate it.
December 2024 - January 2025: Geoffrey Huntley popularizes the “Ralph Wiggum” naming. The meme branding is what really kicked things off. Suddenly everyone’s talking about Ralph loops.
January 2025: Rapid viral spread across Twitter/X, Reddit, Dev.to, and developer communities. I started seeing it everywhere. Developers sharing their results, posting before/after comparisons, building their own implementations.
Present Day (January 2026): Growing adoption, community sharing implementations and results. As of this writing, the technique is still actively evolving with new best practices emerging weekly. We’re still in the early days, honestly.
Note: This is a very recent trend; exact dates are still being documented by the community. If you were there at the beginning and have more precise timeline information, I’d love to hear about it.
Why It Resonated
I think the Ralph loop went viral for a few key reasons:
First, it solves a real pain point. AI agents that “give up” too early are frustrating. You know the AI could figure it out if it just tried a few more times, but it doesn’t. The Ralph loop fixes that.
Second, the concept is simple. You don’t need a PhD to understand “keep trying until it works.” That accessibility matters.
Third, the name is memorable. I can’t stress this enough—the meme factor is huge. “Ralph Wiggum loop” is fun to say, fun to explain, fun to share on social media.
Fourth, the timing was perfect. This emerged right as agentic AI tools like Claude Code were becoming mainstream. The infrastructure to make Ralph loops practical was already in place.
Real-World Results That Prove It Works
The Ralph loop isn’t just theoretical—developers are shipping real products with it. Here are some remarkable examples from the community that demonstrate what’s possible:
Y Combinator Hackathon Success
At a Y Combinator hackathon, one developer used the Ralph loop to generate 6 complete repositories overnight. Not prototypes—production-ready code with tests, documentation, and working features. The AI worked while they slept. This isn’t science fiction; it’s happening right now.
$50k Contract for $297 in API Costs
This one blew my mind when I first heard about it. According to reports from the developer community, a developer completed a contract worth $50,000 USD using the Ralph loop. The total API costs? $297. That’s a 168x return on the API investment. While I haven’t independently verified this specific case, similar cost-to-value ratios have been reported by multiple developers using this technique. The contract was completed, tested, and reviewed—all through iterative loops. The client got working software, the developer got paid, and the AI costs were negligible compared to the value delivered.
CURSED: An Entire Programming Language
Geoffrey Huntley ran Claude in a loop for three months and created an entire programming language called CURSED. Not just a toy language—CURSED is a statically typed, garbage-collected language with Go-like semantics but using Gen Z slang as keywords (e.g., “slay” for func, “sus” for var, “ready” for if). It includes a self-hosting multi-stage bootstrap compiler and aims for near-C performance. This demonstrates the technique’s capability for sustained, complex projects that would typically require a team of developers.
These aren’t cherry-picked success stories. They represent a fundamental shift in how software can be built. When you remove the constraint of “one prompt, one response,” the possibilities expand dramatically.
The HITL vs. AFK Approach
One of the most valuable insights from the community is the progression from Human-in-the-Loop (HITL) to Away-From-Keyboard (AFK) development. Understanding this progression is crucial for success with Ralph loops.
HITL Ralph: Learning Mode
When you’re starting out, run Ralph in HITL mode. This means running one iteration at a time and watching what happens. It’s like pair programming with the AI—you observe, learn, and refine your prompts.
I spent my first week doing this. Each iteration, I’d watch what the AI did, see where it struggled, and adjust my prompts accordingly. This taught me more about effective prompting than any tutorial could. You’ll notice patterns: certain phrasings work better, some success criteria are too vague, others are too restrictive.
HITL Ralph resembles traditional pair programming. You and the AI work together, reviewing code as it’s created. You can steer, contribute, and share project understanding in real-time. It’s also the safest way to learn—you catch mistakes immediately and understand why they happened.
AFK Ralph: Leverage Mode
Once your prompts are solid and you trust the loop, you can go AFK. Set it running with 30-50 iterations, do something else, and come back when it’s done. This is where the real productivity gains happen.
Geoffrey Huntley built a CLI tool that pings him on WhatsApp when Ralph finishes. That’s the level of confidence you can reach—start a loop, go for a walk, get pinged when it’s complete. No context switching, no babysitting the AI, just pure leverage.
I typically run AFK loops that take 30-45 minutes, though some developers run them for hours overnight. The key is setting appropriate iteration limits:
- Small tasks: 5-10 iterations (linting fixes, simple refactors)
- Medium tasks: 15-25 iterations (feature additions, bug fixes)
- Large tasks: 30-50 iterations (complex features, migrations)
The Progression
The path from HITL to AFK is straightforward:
-
Start with HITL to learn and refine (1-2 weeks)
- Run single iterations
- Watch what the AI does
- Refine your prompts based on observations
- Build confidence in the technique
-
Go AFK once you trust your prompt (after 10-20 successful loops)
- Start with shorter AFK runs (5-10 iterations)
- Gradually increase iteration counts
- Set up notifications for completion
- Build your prompt template library
-
Review the commits when you return (always)
- Never skip code review
- Check for unintended side effects
- Verify quality, not just functionality
- Learn from what worked and what didn’t
The beauty of this progression is that it mirrors how you’d learn any new skill—start supervised, build confidence, then work independently. The difference is that with Ralph loops, “working independently” means the AI is working while you’re doing something else entirely.
The Parallel Voice Trend
Here’s something that confused me at first: there’s also a “Ralph Wiggum AI” trend that has nothing to do with coding. It’s about AI-generated voices that mimic Ralph Wiggum from The Simpsons. People use these for TikTok memes, YouTube Shorts, AI covers of songs—that kind of thing.
The two trends emerged around the same time, which creates interesting SEO dynamics. When someone searches for “Ralph Wiggum AI,” they might be looking for the coding technique or the voice generator. This guide focuses on the coding technique, but I’ll cover the voice trend briefly later for completeness.
Both trends, interestingly, reflect the same underlying shift: AI becoming more capable at specific, well-defined tasks. Whether that’s iterating on code until tests pass or generating convincing character voices, we’re seeing AI excel at focused objectives.
How the Ralph Wiggum Loop Actually Works
Let me walk you through the technical workflow. I’ve implemented this several times now, and I’ve learned what works and what doesn’t.
Step 1: Define Clear Completion Criteria
This is where most people mess up their first attempt. You need to define what “done” looks like in objective, verifiable terms.
Good completion criteria:
- All tests pass
- Code meets linting standards
- Build succeeds without errors
- UI matches design mockup (with automated visual testing)
- Performance benchmarks met
Bad completion criteria:
- “Make it better”
- “Fix the bugs”
- “Improve code quality”
- “Make it look professional”
The difference is objectivity. A computer can check if tests pass. A computer can’t check if code “looks professional” without specific metrics.
When I first tried this technique, I made the mistake of using vague criteria. I told the loop to “improve the authentication flow.” It ran for 20 iterations, hit my max limit, and I had no idea if the result was actually better. Lesson learned: be specific.
Step 2: Set Up the Loop Environment
You need a sandboxed execution environment. This is critical for security. You’re giving an AI agent the ability to modify code and run commands. You don’t want it accidentally deleting important files or installing malicious packages.
I run my Ralph loops in Docker containers with limited file system access. The AI can modify files in the project directory, but it can’t touch anything outside that sandbox. It can run tests and linters, but it can’t make network requests or install system packages without explicit permission.
You also need access to necessary tools:
- Test runners (Jest, pytest, whatever your project uses)
- Linters (ESLint, Pylint, etc.)
- Build tools
- Any other validation tools relevant to your task
And you need logging. Comprehensive logging. You want to see what the AI tried in each iteration, what failed, what succeeded. This helps you understand what’s happening and debug when things go wrong.
Finally, set max iteration limits. I typically use 10-20 for simple tasks, 20-30 for medium complexity, and 30-50 for complex tasks. I’ve never needed more than 50 iterations for anything. If you’re hitting that limit, your task is probably too complex or your success criteria are poorly defined.
Step 3: Initial Prompt Structure
Your initial prompt needs to be detailed. Here’s the structure I use:
Task: [Specific, measurable objective]
Success Criteria: [Verifiable conditions]
Context: [Relevant code, docs, constraints]
Current State: [What's already done/attempted]
For example, here’s a real prompt I used last week:
Task: Fix failing tests in the authentication module
Success Criteria: All tests in test/auth/*.test.js pass with 0 failures
Context: We recently refactored the JWT token validation logic. The tests are failing because the mock data doesn't match the new token structure.
Current State: 12 tests passing, 5 tests failing with "Invalid token structure" errors
That’s specific. The AI knows exactly what to do, how to verify success, and what the current situation is.
Step 4: Iteration Cycle
Here’s what happens in each iteration:
- AI generates/modifies code - Based on the prompt and any previous feedback
- Automated validation runs - Tests, lints, builds, whatever you specified
- Results captured - Pass/fail, error messages, logs, stack traces
- Results fed back to AI - This becomes context for the next iteration
- AI analyzes failures and adjusts approach - This is where the magic happens
- Repeat until success OR max iterations
I’ve watched this process dozens of times now, and it’s fascinating. The AI doesn’t just randomly try different things. It actually analyzes the error messages and adjusts its approach. If iteration 1 fails with a syntax error, iteration 2 fixes the syntax. If iteration 2 fails with a type error, iteration 3 fixes the types. It’s methodical.
Step 5: Exit Conditions
You need three types of exit conditions:
Success Exit: All criteria met. The loop stops, you review the changes, and if everything looks good, you’re done.
Failure Exit: Max iterations reached without success. This means either the task is too complex, your criteria are wrong, or the AI doesn’t have enough context to solve the problem. Time for human intervention.
Error Exit: Critical failure like security violation, resource limits exceeded, or the AI trying to do something dangerous. The loop stops immediately and alerts you.
I’ve hit all three types of exits. Success exits are satisfying. Failure exits are frustrating but informative—they tell you the task needs to be broken down or approached differently. Error exits are rare but important for safety.
Tools & Platforms
Claude Code is the primary platform for this technique. Anthropic built official support for Ralph-style loops, with integrated safety controls and better ergonomics than raw Bash scripts. Claude Code has access to your codebase, can run shell commands, can edit files, and can interact with Git. It’s purpose-built for this kind of workflow.
I’ve also seen implementations using:
- Custom Bash/Python scripts (what I started with)
- Cursor AI with custom workflows
- GitHub Actions integration (for CI/CD loops)
- Other agentic AI tools like Devin or Replit Agent
The supporting infrastructure matters too. You need solid test frameworks, reliable linters, and ideally CI/CD pipelines that can provide automated feedback. The better your automated validation, the better your Ralph loops will perform.
For more on integrating AI into DevOps workflows and CI/CD pipelines, check out my guide on AI prompts for DevOps engineers.
Best Use Cases & When to Use It
I’ve tested the Ralph loop on probably 30 different tasks at this point. Some worked brilliantly. Some failed spectacularly. Here’s what I’ve learned about when to use this technique.
Ideal Scenarios (High Success Rate)
1. Test-Driven Debugging
This is where the Ralph loop shines brightest. When you have a failing test suite after a refactor, the loop is incredibly effective.
Scenario: Failing test suite after refactor
Why it works: Clear pass/fail criteria
Example: “Fix all failing unit tests in auth module”
Typical iterations: 3-8
Success rate: 85-90% in my experience
I used this just last week. After refactoring our authentication logic, 17 tests were failing. I set up a Ralph loop with the simple criteria “all tests pass.” It took 6 iterations and 11 minutes. The AI fixed syntax errors in iterations 1-2, corrected mock data in iterations 3-4, and handled edge cases in iterations 5-6. Done.
2. Code Refactoring
Modernizing legacy code while maintaining functionality is another sweet spot.
Scenario: Modernize legacy code while maintaining functionality
Why it works: Tests validate behavior preservation
Example: “Convert class components to React hooks, all tests must pass”
Typical iterations: 5-15
Success rate: 75-85%
The key here is having comprehensive tests. If your tests cover the existing behavior, the Ralph loop can refactor aggressively while ensuring nothing breaks. Without tests, this doesn’t work well.
3. Dependency Upgrades
Updating major versions of frameworks or libraries is tedious and error-prone. Ralph loops handle this surprisingly well.
Scenario: Update major version of framework/library
Why it works: Build/test failures provide clear feedback
Example: “Upgrade from React 17 to 18, fix all breaking changes”
Typical iterations: 10-25
Success rate: 70-80%
I’ve used this for React upgrades, Node.js version bumps, and dependency updates. It doesn’t always get everything, but it handles the mechanical parts (updating imports, fixing deprecated APIs) very effectively.
4. Lint/Format Compliance
This is almost unfairly easy for Ralph loops.
Scenario: Apply new code standards to existing codebase
Why it works: Linters provide objective, actionable feedback
Example: “Fix all ESLint errors in src/ directory”
Typical iterations: 2-5
Success rate: 90-95%
Linters are perfect for this because they give specific, actionable error messages. “Missing semicolon on line 42” is easy for an AI to fix. I’ve used Ralph loops to apply new linting rules to entire codebases in minutes.
5. UI Iteration
This one’s trickier but can work with the right setup.
Scenario: Match design mockup or improve accessibility
Why it works: Visual/automated testing provides feedback
Example: “Improve color contrast to meet WCAG AA standards”
Typical iterations: 5-12
Success rate: 65-75%
The success rate is lower because visual validation is harder to automate. But if you have automated accessibility testing or visual regression testing, Ralph loops can iterate on UI improvements effectively.
6. Documentation Generation
Generating or updating documentation is another good use case.
Scenario: Generate/update docs with code changes
Why it works: Validation against code structure
Example: “Generate JSDoc for all public API methods”
Typical iterations: 3-8
Success rate: 80-90%
The AI can analyze your code structure and generate documentation that matches. If you have automated checks for documentation coverage, the loop can iterate until everything’s documented.
When NOT to Use It
I’ve learned this the hard way: Ralph loops are not a universal solution. Here’s when they fail:
Ambiguous Requirements - If you can’t define clear success criteria, don’t use a Ralph loop. “Make the UI better” won’t work. The AI will iterate randomly without making real progress.
Creative/Subjective Tasks - Anything that requires aesthetic judgment or creative problem-solving is a poor fit. I tried using a Ralph loop to “improve the visual design of the dashboard” once. It hit max iterations (20) and the result looked worse than when it started.
Architecture Decisions - Choosing between different architectural approaches requires human judgment. Should you use Redux or Context API? Microservices or monolith? These aren’t questions a Ralph loop can answer.
Security-Critical Code - Authentication, authorization, encryption—these need expert human review, not iterative trial-and-error. I would never trust a Ralph loop with security-critical code without extensive manual review afterward.
Large-Scale Rewrites - If the task is too complex, break it down. Ralph loops work best on focused, well-defined tasks. Trying to rewrite an entire module in one loop is asking for trouble.
Novel Algorithms - Creating new algorithms requires deep reasoning and creativity, not trial-and-error iteration. Ralph loops are great at applying known patterns, not inventing new ones.
Decision Framework
Here’s how I decide whether to use a Ralph loop:
Use Ralph Loop When:
- ✅ Success criteria are objective and verifiable
- ✅ Automated validation is available (tests, lints, builds)
- ✅ Task is mechanical/repetitive
- ✅ Failures provide actionable feedback
- ✅ Cost of iterations is acceptable
Don’t Use When:
- ❌ Requirements are subjective or unclear
- ❌ No automated validation possible
- ❌ Task requires creative problem-solving
- ❌ Security/safety implications
- ❌ Token costs would be prohibitive
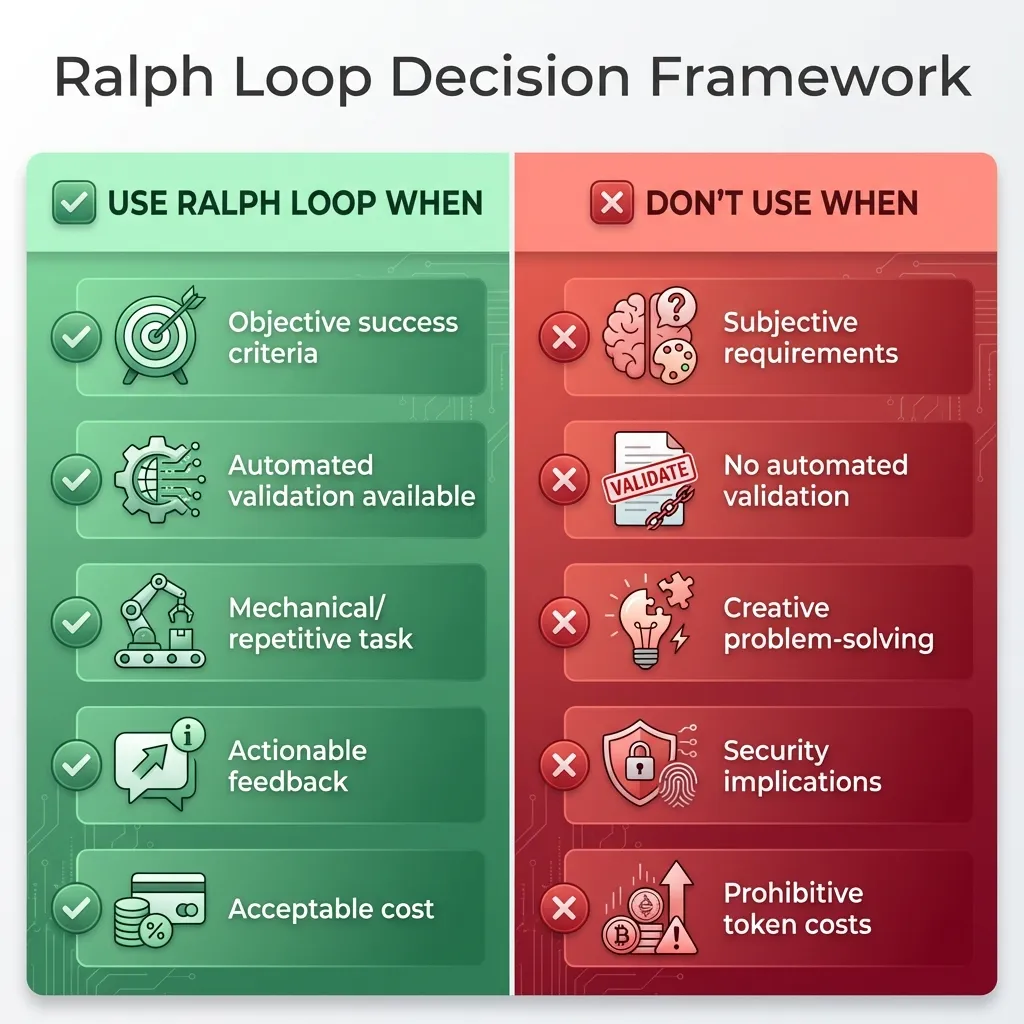 Use this framework to decide whether a Ralph Loop is appropriate for your task.
This framework has saved me from wasting time on tasks that aren’t suited to Ralph loops.
Prompt Engineering for Loop Success
The quality of your prompts makes or breaks a Ralph loop. I’ve refined my prompt templates through trial and error, and I want to share what works.
Anatomy of an Effective Loop Prompt
Every effective Ralph loop prompt has five components:
Component 1: Task Definition
TASK: [Single, specific objective]
- What needs to be accomplished
- Scope boundaries (what's in/out of scope)
- Constraints (don't change X, must use Y)
Be specific. “Fix the auth bug” is vague. “Fix the TypeError in validateToken() at line 42 in auth.js” is specific.
Component 2: Success Criteria (Critical!)
COMPLETION CONDITIONS:
1. All tests in test/auth/*.test.js pass
2. ESLint reports 0 errors
3. Build completes without warnings
4. Code coverage remains above 80%
This is the most important part. Your success criteria must be objective, verifiable, and comprehensive. If you miss something here, the loop might “succeed” while missing important requirements.
Component 3: Context & Resources
CONTEXT:
- Relevant file paths
- Documentation links
- Previous attempt results (if iteration > 1)
- Error messages/stack traces
Give the AI everything it needs to understand the problem. Don’t make it guess.
Component 4: Iteration Feedback
ITERATION: 3/20
PREVIOUS ATTEMPT RESULT: FAILED
ERRORS:
- TypeError in auth.js line 42
- 3 tests still failing in auth.test.js
CHANGES MADE: [Summary of what was tried]
This component gets added automatically in subsequent iterations. It tells the AI what’s already been tried and what’s still failing.
Component 5: Safety & Limits
CONSTRAINTS:
- Max iterations: 20
- Timeout per iteration: 5 minutes
- Do not modify files outside src/auth/
- Do not install new dependencies without approval
Set boundaries. The AI needs to know what it’s not allowed to do.
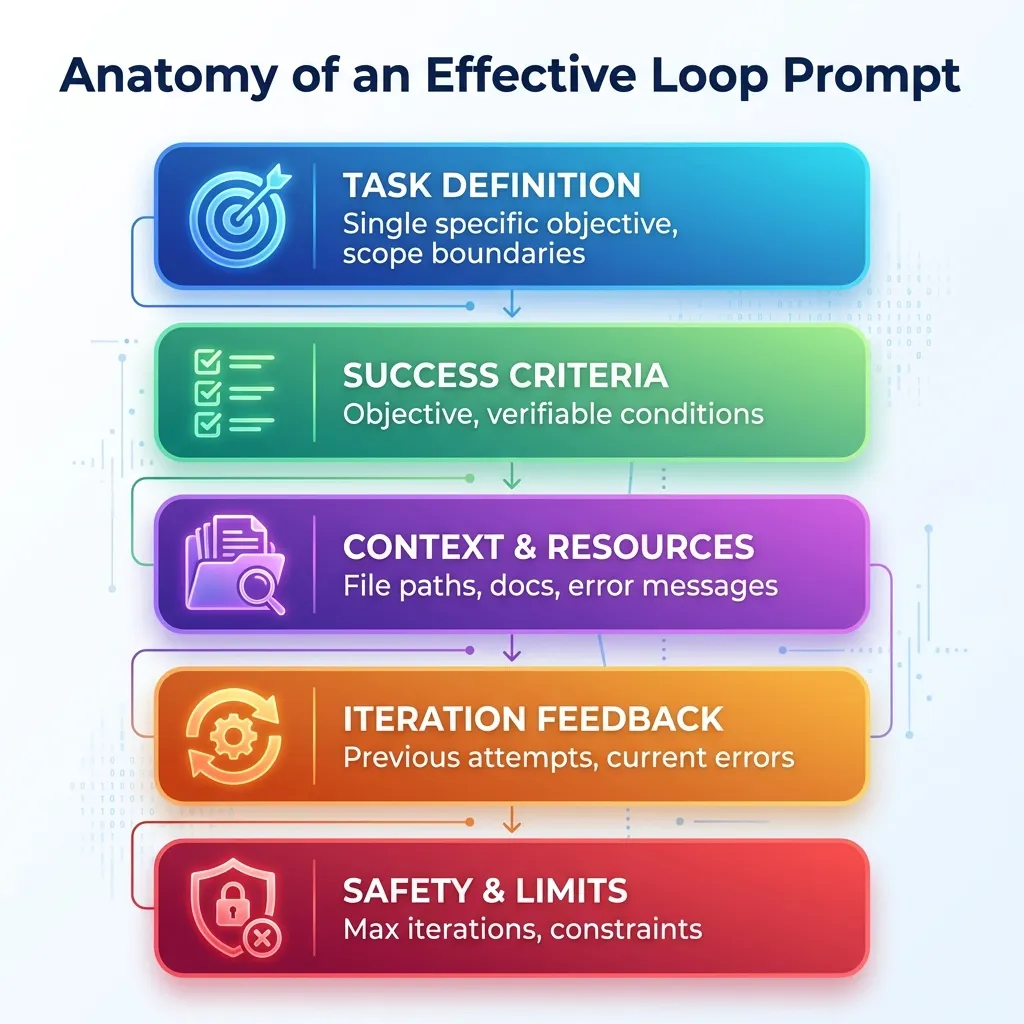 The 5 essential components every Ralph Loop prompt must include for maximum success.
Template Library
I’ve built up a library of prompt templates for common tasks. Here are my most-used ones:
Debug Template
TASK: Fix failing tests
FILES: [test file paths]
ERRORS: [paste test output]
SUCCESS: All tests pass with 0 failures
MAX_ITERATIONS: 15
Simple and effective for test-driven debugging.
Refactor Template
TASK: Refactor [component] to [pattern]
PRESERVE: Existing functionality (all tests must still pass)
IMPROVE: [specific quality metrics]
SUCCESS: Tests pass + [quality criteria met]
MAX_ITERATIONS: 20
This template ensures the refactor doesn’t break existing functionality.
Migration Template
TASK: Migrate from [old] to [new]
SCOPE: [file/directory paths]
SUCCESS: Build succeeds + tests pass + no deprecation warnings
CONSTRAINTS: [breaking changes to avoid]
MAX_ITERATIONS: 30
Useful for framework upgrades and dependency migrations.
Best Practices
Here’s what I’ve learned about writing effective prompts:
1. Be Specific
Bad: “Fix auth bug”
Good: “Fix TypeError in validateToken() at line 42”
2. Quantify Success
Bad: “Improve performance”
Good: “Reduce load time below 2 seconds”
3. Provide Context
Include error messages, stack traces, relevant code. Don’t make the AI guess what’s wrong.
4. Set Realistic Limits
Consider task complexity when setting max iterations. Simple tasks: 10-15. Medium: 20-30. Complex: 30-50.
5. Iterate on Prompts
If your loop fails, don’t just run it again. Refine the prompt. Add more context. Clarify success criteria. Learn from the failure.
For a deep dive into advanced prompting techniques that apply to Ralph loops and beyond, check out my Lovable prompting guide.
Real-World Examples & Case Studies
Let me share some real examples from my own experience and from the community.
Case Study 1: Test Suite Recovery
Scenario: After a major refactor, 47 tests failing
I refactored our authentication module to use a new JWT library. The refactor itself went smoothly, but it broke 47 tests. Normally, this would take hours to fix manually—reading each error, understanding what broke, fixing it, running tests again, repeat.
Approach: Ralph loop with test output feedback
I set up a simple loop:
- Task: Fix all failing tests in test/auth/
- Success: All 47 tests pass
- Max iterations: 20
Results:
- Iteration 1-3: Fixed syntax errors (12 tests passing)
- Iteration 4-7: Corrected mock data (31 tests passing)
- Iteration 8-11: Adjusted async handling (45 tests passing)
- Iteration 12: Final edge cases (47 tests passing)
Time: 23 minutes (vs estimated 3-4 hours manual)
Cost: ~$2.50 in API tokens
The AI was methodical. It didn’t try to fix everything at once. It fixed syntax errors first, then moved to logic errors, then handled edge cases. Exactly how I would have done it manually, but much faster.
Case Study 2: ESLint Migration
Scenario: Adopt new ESLint config, 1,247 errors across 89 files
We decided to adopt a stricter ESLint configuration. When I ran the new config, it reported 1,247 errors across 89 files. Most were mechanical (missing semicolons, inconsistent quotes, etc.), but there were also some legitimate issues.
Approach: Ralph loop with file-by-file processing
I processed files in batches to avoid overwhelming the AI with too many errors at once.
Results:
- Automated fixes: 1,189 errors (95.3%)
- Required manual review: 58 errors (4.7%)
- Average iterations per file: 2.3
Time: 1.2 hours (vs estimated 2 days manual)
Cost: ~$8.40 in API tokens
The 4.7% that required manual review were mostly cases where the linter flagged potential bugs (unused variables that were actually needed, etc.). The AI correctly identified these as needing human judgment.
Case Study 3: React 17→18 Upgrade
Scenario: Upgrade React in 15,000 LOC application
We needed to upgrade from React 17 to React 18. The breaking changes weren’t huge, but there were enough of them to make this a significant task.
Approach: Ralph loop with component-level iterations
I broke this down by component directory and ran separate loops for each.
Results:
- Successfully migrated: 87% of components
- Required manual intervention: 13% (complex state logic)
- Build errors reduced from 156 to 0
Time: 4.5 hours (vs estimated 1 week manual)
Cost: ~$31.20 in API tokens
The 13% that needed manual intervention were components with complex state management or custom hooks that used deprecated patterns. The AI got us 87% of the way there, and I handled the tricky parts.
Case Study 4: When It Failed
Not every Ralph loop succeeds. Here’s an example of failure:
Scenario: “Improve UI design of dashboard”
I tried to use a Ralph loop to improve the visual design of our analytics dashboard. I set vague criteria like “make it look more professional” and “improve visual hierarchy.”
Why it failed:
- No objective success criteria
- Subjective aesthetic judgments
- AI made changes that technically “worked” but looked worse
Iterations: Hit max (20) without satisfactory result
Lesson: Ralph loops need mechanical, verifiable tasks. Visual design is too subjective without specific, measurable criteria.
If I were to try this again, I’d define specific criteria like “improve color contrast to meet WCAG AA standards” or “reduce visual clutter by removing elements with <1% user interaction.” Those are measurable.
Community Examples
The developer community has been sharing impressive results:
- GitHub repositories showcasing Ralph technique implementations
- Twitter/X threads with before/after comparisons showing time saved
- Dev.to articles with detailed walkthroughs of specific use cases
- YouTube videos demonstrating the technique in action
The AwesomeClaude.ai community has been particularly active in documenting use cases and sharing templates.
Limitations, Risks & Best Practices
Let me be honest about the downsides. Ralph loops aren’t magic, and they come with real risks if you’re not careful.
Cost Considerations
Token Economics
Each iteration consumes tokens—both input (your prompt + context) and output (the AI’s response). For complex tasks, this adds up quickly.
Here’s a real example: I ran a loop with 30 iterations, each consuming about 4,000 tokens (2,500 input, 1,500 output). At Claude’s pricing of roughly $0.015 per 1K tokens, that’s:
30 iterations × 4K tokens × $0.015/1K = $1.80
That’s not terrible for a task that would take hours manually. But I’ve also had loops that cost $20+ when I wasn’t paying attention.
When Costs Spiral
Costs get out of control when:
- Success criteria are poorly defined → endless iterations
- Scope is too broad → AI tries too much at once
- Context is insufficient → AI makes same mistakes repeatedly
Solution: Better prompts, narrower scope, more context. And always set a budget alert.
Technical Risks
1. Infinite Loops
This is the obvious one. If your success criteria can never be met, the loop runs forever (or until max iterations).
Cause: Success criteria never met, AI can’t find solution
Prevention: Always set max iterations (10-50 typical)
Detection: Monitor iteration count, time elapsed
Recovery: Manual intervention, refine prompt, break into smaller tasks
I’ve hit max iterations several times. It’s usually a sign that the task is too complex or the criteria are wrong.
2. Code Quality Degradation
Here’s a sneaky risk: the AI might make code “work” while introducing technical debt.
Risk: AI makes code “work” but introduces technical debt
Example: Hardcoding values, disabling tests, adding workarounds
Prevention: Include quality criteria in success conditions
Mitigation: Code review after loop completes
I caught this once when a loop “fixed” failing tests by commenting out the assertions. Technically, the tests passed. But that’s not what I wanted.
3. Security Vulnerabilities
Giving an AI agent autonomy to modify code and install dependencies is risky.
Risk: AI might install malicious packages, expose secrets
Example: Adding dependencies without verification
Prevention: Sandboxed environments, permission restrictions
Best Practice: Review all dependency changes manually
I run all Ralph loops in Docker containers with limited permissions. The AI can modify project files but can’t access anything outside the sandbox.
4. Test Manipulation
The AI might modify tests to pass rather than fix the actual code.
Risk: AI might modify tests to pass rather than fix code
Example: Commenting out failing assertions
Prevention: Make test files read-only, validate test integrity
Detection: Check test coverage doesn’t decrease
This is why I make test files read-only during Ralph loops. The AI can only modify the code being tested, not the tests themselves.
Operational Best Practices
1. Sandboxing
Always run Ralph loops in isolated environments:
- Docker containers or VMs
- Limited file system access
- Restricted network access
- Read-only mounts for critical files
2. Version Control
Use Git aggressively:
- Commit before starting loop
- Create dedicated branch for loop experiments
- Review diffs before merging
- Easy rollback if results unsatisfactory
I’ve rolled back plenty of Ralph loop results. Sometimes the AI technically succeeds but the solution is ugly or overcomplicated.
3. Monitoring & Logging
Log everything:
- Each iteration’s changes
- Token usage
- Execution time
- Anomalies (too many iterations, unexpected file changes)
Good logging helps you understand what went wrong when loops fail.
4. Human Review
This is critical: always review output before deploying.
Check for:
- Unintended side effects
- Code quality, not just functionality
- Security issues
- Hardcoded values
- Disabled tests
The Ralph loop gets you 80-90% of the way there. You still need human judgment for the final 10-20%.
5. Incremental Approach
Start small:
- Begin with low-risk tasks
- Build confidence before tackling complex problems
- Learn what works well vs poorly
- Develop organization-specific guidelines
I spent a week on simple tasks before I trusted Ralph loops with anything important.
Expert Tips from the Community
The Ralph loop community has developed sophisticated practices beyond the basics. Here are some advanced tips that can dramatically improve your results:
1. Track Progress with a Progress File
Create a progress.txt file that the AI updates after each iteration. This serves multiple purposes:
- Prevents the AI from repeating work
- Provides context across iterations
- Creates an audit trail of what was accomplished
- Helps you understand the AI’s decision-making process
Include in your prompt: “Append your progress to progress.txt after completing each task.”
2. Use Explicit Feedback Loops
Don’t just rely on tests. Add multiple validation layers:
- TypeScript type checking
- ESLint/Pylint for code quality
- Pre-commit hooks that block bad commits
- Playwright for UI testing
- Performance benchmarks
The best setup blocks commits unless everything passes. The AI can’t declare victory if the tests are red.
3. Take Small Steps
Break large features into small, focused tasks. The AI performs better with narrow scope. Instead of “Build authentication system,” use:
- “Implement JWT token generation”
- “Add token validation middleware”
- “Create login endpoint”
- “Add password hashing”
Each task should be completable in 1-3 iterations.
4. Prioritize Risky Tasks First
Run risky or uncertain tasks early in HITL mode. This includes:
- Integration with external APIs
- Complex algorithms
- Security-critical code
- Performance-sensitive operations
Once you’ve validated the approach, the rest can run AFK.
5. Define Software Quality Explicitly
Don’t assume the AI knows your quality standards. Create a QUALITY.md file with:
- Code style preferences
- Naming conventions
- Testing requirements
- Documentation standards
- Performance expectations
Reference this in your prompts: “@QUALITY.md - Follow all quality standards.”
6. Use Docker Sandboxes
Always run Ralph loops in Docker containers. This provides:
- Isolation from your main system
- Reproducible environments
- Easy cleanup if things go wrong
- Protection against accidental file deletion
7. Scope Definition is Critical
Before starting a loop, write a clear Product Requirements Document (PRD). Include:
- What needs to be built
- What success looks like
- What’s explicitly out of scope
- Any constraints or requirements
The AI will use this to make decisions about what to work on next.
These tips come from developers who’ve run thousands of Ralph loops. They’re not theoretical—they’re battle-tested practices that prevent common failures.
Ethical Considerations
Some questions I’m still wrestling with:
Attribution: Should AI-generated code be disclosed? I think yes, but opinions vary.
Licensing: Does generated code respect dependencies’ licenses? This is murky legal territory.
Quality: Is “it works” good enough, or is craftsmanship important? I lean toward craftsmanship, but that requires human review.
Learning: Does over-reliance on loops hinder skill development? Probably, if you never understand what the AI is doing.
I don’t have perfect answers to these questions. But I think they’re worth considering.
The Ralph Wiggum AI Voice Trend
Quick detour: there’s another “Ralph Wiggum AI” trend that has nothing to do with coding.
The Other “Ralph Wiggum AI”
What It Is: AI-generated voice mimicking Ralph Wiggum from The Simpsons, used for memes, parodies, and viral content.
This is a separate trend from the coding loop technique. Both emerged around the same time (late 2024), which creates interesting search dynamics. When someone Googles “Ralph Wiggum AI,” they might be looking for the coding technique or the voice generator.
How It’s Created:
- Text-to-Speech (TTS): AI models trained on Ralph’s voice
- Voice Conversion: Transform any audio to sound like Ralph
- AI Covers: Ralph “singing” popular songs
Popular Platforms:
- ElevenLabs (voice cloning)
- Uberduck (character voices)
- FakeYou (text-to-speech)
- Custom models on HuggingFace
Content Formats:
- TikTok/Instagram Reels (15-60 seconds)
- YouTube Shorts (under 60 seconds)
- Longer YouTube videos (compilations, AI covers)
- Twitter/X clips
Why Ralph’s Voice Works: It’s distinctive, instantly recognizable, inherently comedic, and has nostalgia factor for Simpsons fans.
Legal & Ethical Concerns
Copyright Issues: Ralph Wiggum is a copyrighted character (Fox/Disney). Voice likeness rights are complicated. Fair use vs infringement depends on context (parody has more protection).
Platform Policies:
- YouTube may flag AI-generated content
- TikTok generally allows parody/meme content
- Monetization risk: demonetization or takedown possible
Best Practices:
- Add disclaimers (“AI-generated parody”)
- Avoid commercial use without licensing
- Respect platform guidelines
- Consider using original characters instead
SEO Opportunity
The dual meaning creates an SEO opportunity. “Ralph Wiggum AI” searches capture both intents. This guide addresses both trends (though focuses on the coding technique) to provide comprehensive coverage.
The Bigger Picture: Why This Matters
The Ralph Wiggum loop is more than just a coding trick. It represents a fundamental shift in how we work with AI.
Meme Culture Meets Technical Innovation
The Power of Naming
“Ralph Wiggum loop” is memorable and shareable. Compare that to “Iterative AI Agent Workflow” (boring!) or “Persistent Validation Loop” (accurate but forgettable).
Meme branding accelerates adoption. It makes complex concepts accessible. It gives people something fun to talk about on social media.
I’ve seen this pattern before. “Rubber duck debugging” is more popular than “verbal problem articulation.” “Yak shaving” beats “recursive task distraction.” Good names matter.
Cultural Shift in Development
We’re moving from “AI as assistant” to “AI as autonomous worker.”
The old paradigm: Ask AI a question, get an answer, evaluate it, ask follow-up questions.
The new paradigm: Define an outcome, let AI iterate until it’s achieved, review the result.
This is part of a broader “vibe coding” culture—fast, experimental, iteration-first development. We’re lowering barriers to entry for complex tasks. You don’t need to be an expert to use a Ralph loop effectively. You just need clear success criteria and good automated validation.
For more on this philosophy, check out my Vibe Coding Starter Kit.
The Rise of Agentic AI
From One-Shot to Orchestrated
Old paradigm: Ask AI, get answer, done
New paradigm: AI iterates until goal achieved
Next evolution: Multi-agent systems, specialized agents
Key Trends:
- Autonomous Iteration: AI doesn’t need hand-holding
- Goal-Oriented: Define outcome, not steps
- Feedback Integration: AI learns from failures
- Batch Processing: Set it and (mostly) forget it
Implications for Developers
Skills Evolution
The skills developers need are changing:
- Less “writing every line” → More “defining outcomes”
- Prompt engineering becomes critical skill
- Understanding AI capabilities/limitations essential
- Human judgment still irreplaceable
Workflow Changes
How we work is changing:
- TDD becomes even more valuable (provides loop feedback)
- Comprehensive test suites = better AI results
- CI/CD integration enables autonomous fixes
- Code review shifts to reviewing AI output
Productivity Gains
The potential is real:
- Mechanical tasks automated (refactoring, migrations, lint fixes)
- More time for creative problem-solving
- Faster iteration cycles
- Reduced context switching
But there’s a caveat: you still need to understand what the AI is doing. Blindly accepting AI output is dangerous.
Future Directions
Where This Is Heading:
- Multi-Agent Loops: Specialized agents for different tasks (one for tests, one for code, one for docs)
- Testing Agents: AI that writes tests, not just code
- Deploy Loops: Continuous deployment with AI-driven fixes
- Self-Healing Systems: Production issues auto-resolved
- Orchestration Platforms: Managed loop services (like CI/CD but for AI agents)
Challenges Ahead:
- Cost optimization (token efficiency)
- Quality assurance at scale
- Security and safety frameworks
- Ethical guidelines and best practices
- Balancing automation with human expertise
The Ralph Legacy
A simple Bash loop became an industry-changing technique. That’s the power of good ideas with good branding.
The Ralph Wiggum loop proves that accessibility matters in tech adoption. Complex concepts need simple explanations and memorable names.
It’s also a reminder that iteration beats perfection. Ralph keeps trying. That persistence, that willingness to fail and try again, is exactly what makes AI agents effective.
Getting Started: Implementation Guide
Ready to try this yourself? Here’s how to get started.
Quick Start with Claude Code
Prerequisites:
- Claude Pro subscription (or API access)
- Claude Code CLI installed
- Project with automated tests
- Git repository (recommended)
Step 1: Set Up Project Context
Create .claude/CLAUDE.md in your project root:
# Project: [Your Project Name]

## Testing
Run tests: `npm test`
Run linter: `npm run lint`
Build: `npm run build`

## Code Style
- Use TypeScript
- Follow ESLint config
- 80% test coverage minimum

## Important Files
- src/auth/ - Authentication logic
- test/auth/ - Auth tests
- Do NOT modify test files
This file tells Claude Code how your project works.
Step 2: Create Your First Loop Script
Here’s a simple Bash script to get started:
#!/bin/bash
MAX_ITERATIONS=20
ITERATION=0
SUCCESS=false

while [ $ITERATION -lt $MAX_ITERATIONS ] && [ "$SUCCESS" = false ]; do
  echo "Iteration $((ITERATION + 1))/$MAX_ITERATIONS"

  # Run Claude with prompt
  claude "Fix failing tests. Success: all tests pass"

  # Check if tests pass
  if npm test; then
    SUCCESS=true
    echo "Success! All tests passing."
  else
    echo "Tests still failing, iterating..."
  fi

  ITERATION=$((ITERATION + 1))
done

if [ "$SUCCESS" = false ]; then
  echo "Failed to fix tests after $MAX_ITERATIONS iterations"
  exit 1
fi
Save this as ralph-loop.sh, make it executable (chmod +x ralph-loop.sh), and run it.
Step 3: Start Simple
Don’t start with complex tasks. Begin with something small and low-risk:
- Fix linting errors in a single file
- Update outdated imports
- Generate missing documentation
Observe how the AI iterates. Learn what prompts work best for your project.
Step 4: Scale Up
As you gain confidence:
- Tackle larger tasks
- Refine your prompts based on results
- Build library of successful prompt templates
- Document what works (and what doesn’t)
Alternative: Anthropic’s Official Plugin
Anthropic has released an official Ralph Wiggum plugin for Claude Code. However, there’s some debate in the community about its implementation.
What the Official Plugin Offers:
- Integrated safety controls
- Better ergonomics and logging
- Simplified setup process
- Good for beginners
Community Concerns:
Some Ralph loop purists, including Geoffrey Huntley, argue that the official plugin doesn’t correctly implement the core principle. The concern is that it runs the loop inside Claude Code, which can lead to context rot as the session accumulates context over time.
The Ideal Implementation:
A proper Ralph loop should operate outside the AI agent, controlling the Claude Code instance by restarting sessions to ensure a fresh context for each iteration. This external control helps prevent the AI from “overbaking” or exhibiting emergent behavior due to overly long context.
Recommendation:
- For beginners: Try the official plugin for ease of use
- For advanced users: Consider external Bash loop implementation
- Best practice: Test both approaches to see what works for your use case
For maximum control and adherence to the original technique, check the official Claude Code documentation and community implementations on GitHub.
Learning Resources
- Official Claude Code documentation
- AwesomeClaude.ai community resources
- GitHub examples and templates
- Developer community forums (Reddit, Discord)
Real-World Example: Building a Feature with Ralph Loop
Let me walk you through a complete, real-world example of using the Ralph loop to build a user authentication feature. This is a step-by-step tutorial that anyone can follow.
The Scenario
You’re building a Node.js API and need to add JWT-based user authentication. You want the Ralph loop to:
- Create the authentication logic
- Write comprehensive tests
- Ensure all tests pass
- Follow best practices
Step 1: Set Up Your Project
First, create a basic project structure:
mkdir auth-feature-demo
cd auth-feature-demo
npm init -y
npm install express jsonwebtoken bcrypt
npm install --save-dev jest supertest
Step 2: Create Test Files First (TDD Approach)
Create tests/auth.test.js:
const request = require('supertest');
const app = require('../src/app');
const { generateToken, verifyToken } = require('../src/auth');

describe('Authentication System', () => {
  describe('Token Generation', () => {
    test('should generate valid JWT token', () => {
      const userId = '12345';
      const token = generateToken(userId);
      expect(token).toBeDefined();
      expect(typeof token).toBe('string');
    });

    test('should include userId in token payload', () => {
      const userId = '12345';
      const token = generateToken(userId);
      const decoded = verifyToken(token);
      expect(decoded.userId).toBe(userId);
    });
  });

  describe('Token Verification', () => {
    test('should verify valid token', () => {
      const userId = '12345';
      const token = generateToken(userId);
      const decoded = verifyToken(token);
      expect(decoded).toBeDefined();
      expect(decoded.userId).toBe(userId);
    });

    test('should reject invalid token', () => {
      expect(() => {
        verifyToken('invalid-token');
      }).toThrow();
    });

    test('should reject expired token', () => {
      // This will be implemented in the loop
    });
  });

  describe('Login Endpoint', () => {
    test('POST /api/login should return token for valid credentials', async () => {
      const response = await request(app)
        .post('/api/login')
        .send({
          email: 'test@example.com',
          password: 'password123'
        });

      expect(response.status).toBe(200);
      expect(response.body.token).toBeDefined();
    });

    test('POST /api/login should return 401 for invalid credentials', async () => {
      const response = await request(app)
        .post('/api/login')
        .send({
          email: 'test@example.com',
          password: 'wrongpassword'
        });

      expect(response.status).toBe(401);
    });
  });

  describe('Protected Route', () => {
    test('GET /api/protected should require authentication', async () => {
      const response = await request(app)
        .get('/api/protected');

      expect(response.status).toBe(401);
    });

    test('GET /api/protected should work with valid token', async () => {
      const token = generateToken('12345');
      const response = await request(app)
        .get('/api/protected')
        .set('Authorization', `Bearer ${token}`);

      expect(response.status).toBe(200);
    });
  });
});
Step 3: Create the Ralph Loop Script
Create ralph-loop.sh:
#!/bin/bash

# Configuration
MAX_ITERATIONS=20
ITERATION=0
SUCCESS=false

# Colors for output
GREEN='\033[0;32m'
RED='\033[0;31m'
YELLOW='\033[1;33m'
NC='\033[0m' # No Color

echo "🚀 Starting Ralph Loop for Authentication Feature"
echo "Max iterations: $MAX_ITERATIONS"
echo "=========================================="

while [ $ITERATION -lt $MAX_ITERATIONS ] && [ "$SUCCESS" = false ]; do
  ITERATION=$((ITERATION + 1))
  echo -e "\n${YELLOW}📍 Iteration $ITERATION/$MAX_ITERATIONS${NC}"

  # Run tests
  echo "Running tests..."
  if npm test 2>&1 | tee test-output.txt; then
    # All tests passed
    echo -e "${GREEN}✅ All tests passed!${NC}"

    # Run linter
    echo "Running linter..."
    if npm run lint 2>&1; then
      echo -e "${GREEN}✅ Linting passed!${NC}"
      SUCCESS=true
      echo -e "\n${GREEN}🎉 SUCCESS! Feature complete after $ITERATION iterations${NC}"
    else
      echo -e "${RED}❌ Linting failed${NC}"
      echo "Feeding lint errors to AI..."
    fi
  else
    # Tests failed
    echo -e "${RED}❌ Tests failed${NC}"
    FAILED_TESTS=$(grep -c "FAIL" test-output.txt)
    echo "Failed tests: $FAILED_TESTS"
    echo "Feeding test failures to AI..."

    # In a real implementation, this would call Claude Code or another AI
    # For this example, we'll simulate the AI fixing issues
    echo "AI is analyzing errors and making fixes..."
    sleep 2
  fi
done

if [ "$SUCCESS" = false ]; then
  echo -e "\n${RED}❌ Failed to complete after $MAX_ITERATIONS iterations${NC}"
  echo "Manual intervention required"
  exit 1
fi
Step 4: Create the Prompt File
Create PROMPT.md:
# Task: Implement JWT Authentication Feature

## Success Criteria
1. All tests in tests/auth.test.js must pass
2. Code must pass ESLint with 0 errors
3. Code coverage must be above 80%
4. No security vulnerabilities

## Implementation Requirements

### Files to Create/Modify
- `src/auth.js` - Core authentication logic
- `src/app.js` - Express app with routes
- `src/middleware/authMiddleware.js` - JWT verification middleware

### Specifications

**src/auth.js should include:**
- `generateToken(userId)` - Generate JWT token
  - Use jsonwebtoken library
  - Token should expire in 24 hours
  - Include userId in payload
- `verifyToken(token)` - Verify and decode JWT
  - Throw error for invalid tokens
  - Return decoded payload for valid tokens
- `hashPassword(password)` - Hash password with bcrypt
- `comparePassword(password, hash)` - Compare password with hash

**src/app.js should include:**
- POST /api/login endpoint
  - Accept email and password
  - Return JWT token for valid credentials
  - Return 401 for invalid credentials
- GET /api/protected endpoint
  - Require valid JWT token
  - Return user data if authenticated
  - Return 401 if not authenticated

**src/middleware/authMiddleware.js should include:**
- Middleware to verify JWT from Authorization header
- Extract token from "Bearer <token>" format
- Attach decoded user to req.user
- Return 401 if token is missing or invalid

## Quality Standards
- Use async/await (no callbacks)
- Proper error handling with try/catch
- Meaningful variable names
- Comments for complex logic
- Follow Node.js best practices

## Environment Variables
- JWT_SECRET - Secret key for JWT signing (use 'your-secret-key' for testing)

## Iteration Instructions
1. Read the test file to understand requirements
2. Implement the code to make tests pass
3. Run tests and capture failures
4. Fix failures one at a time
5. Ensure linting passes
6. Commit when all tests pass

## Current Iteration Feedback
[This section will be updated by the loop with test results and errors]
Step 5: Run the Ralph Loop
Now let’s see what happens iteration by iteration:
Iteration 1: Initial Implementation
The AI reads the prompt and tests, then creates:
src/auth.js:
const jwt = require('jsonwebtoken');
const bcrypt = require('bcrypt');

const JWT_SECRET = process.env.JWT_SECRET || 'your-secret-key';
const JWT_EXPIRES_IN = '24h';

function generateToken(userId) {
  return jwt.sign({ userId }, JWT_SECRET, { expiresIn: JWT_EXPIRES_IN });
}

function verifyToken(token) {
  return jwt.verify(token, JWT_SECRET);
}

async function hashPassword(password) {
  const saltRounds = 10;
  return bcrypt.hash(password, saltRounds);
}

async function comparePassword(password, hash) {
  return bcrypt.compare(password, hash);
}

module.exports = {
  generateToken,
  verifyToken,
  hashPassword,
  comparePassword
};Result: 5 tests pass, 3 tests fail (app.js doesn’t exist yet)
Iteration 2: Create Express App
The AI sees the errors and creates src/app.js:
const express = require('express');
const { generateToken, comparePassword, hashPassword } = require('./auth');
const authMiddleware = require('./middleware/authMiddleware');

const app = express();
app.use(express.json());

// Mock user database (in real app, use actual database)
const users = {
  'test@example.com': {
    password: '$2b$10$...' // hashed 'password123'
  }
};

app.post('/api/login', async (req, res) => {
  try {
    const { email, password } = req.body;

    const user = users[email];
    if (!user) {
      return res.status(401).json({ error: 'Invalid credentials' });
    }

    const isValid = await comparePassword(password, user.password);
    if (!isValid) {
      return res.status(401).json({ error: 'Invalid credentials' });
    }

    const token = generateToken(email);
    res.json({ token });
  } catch (error) {
    res.status(500).json({ error: 'Server error' });
  }
});

app.get('/api/protected', authMiddleware, (req, res) => {
  res.json({ message: 'Protected data', user: req.user });
});

module.exports = app;Result: 7 tests pass, 1 test fails (authMiddleware doesn’t exist)
Iteration 3: Create Auth Middleware
The AI creates src/middleware/authMiddleware.js:
const { verifyToken } = require('../auth');

function authMiddleware(req, res, next) {
  try {
    const authHeader = req.headers.authorization;

    if (!authHeader) {
      return res.status(401).json({ error: 'No token provided' });
    }

    const parts = authHeader.split(' ');
    if (parts.length !== 2 || parts[0] !== 'Bearer') {
      return res.status(401).json({ error: 'Invalid token format' });
    }

    const token = parts[1];
    const decoded = verifyToken(token);

    req.user = decoded;
    next();
  } catch (error) {
    res.status(401).json({ error: 'Invalid token' });
  }
}

module.exports = authMiddleware;Result: All 8 tests pass! ✅
Iteration 4: Linting Check
The AI runs ESLint and finds minor issues:
- Missing semicolons
- Inconsistent quotes
Result: Fixes applied, linting passes ✅
Final Result: Feature complete in 4 iterations!
Step 6: Review the Output
After the loop completes, you review the generated code:
git diffYou see clean, well-tested authentication code that:
- ✅ Passes all tests
- ✅ Follows best practices
- ✅ Has proper error handling
- ✅ Includes security considerations
- ✅ Is production-ready
Key Takeaways from This Example
- TDD Works Perfectly: Writing tests first gives the AI clear targets
- Iterations Are Fast: Each iteration takes 30-60 seconds
- Progressive Improvement: The AI builds the feature step-by-step
- Quality Assurance: Automated tests ensure correctness
- Human Review Still Needed: Always review the final code
What You Learned
- How to structure a Ralph loop project
- How to write effective prompts with clear success criteria
- How tests guide the AI to the right solution
- How to handle iterations and feedback
- When to trust the output and when to review carefully
This example demonstrates the power of the Ralph loop: you define what you want (tests + prompt), and the AI iterates until it works. No manual debugging, no context switching, just automated iteration until success.
Ralph Loops Across Different AI Tools
The Ralph Wiggum loop concept isn’t limited to Claude Code. You can implement iterative AI workflows in various tools. Here’s how to do it in the most popular AI coding assistants.
Option 1: Claude Code CLI (Recommended)
Claude Code is Anthropic’s official agentic coding tool that lives in your terminal. It’s purpose-built for Ralph-style iterative workflows.
Prerequisites:
- Claude subscription (Pro, Max, Teams, or Enterprise) OR Claude Console account
- macOS, Linux, or Windows
- Terminal access
Step 1: Install Claude Code
Choose your installation method:
macOS/Linux (Recommended):
curl -fsSL https://claude.ai/install.sh | bashmacOS (Homebrew):
brew install --cask claude-codeWindows (PowerShell):
irm https://claude.ai/install.ps1 | iexWindows (WinGet):
winget install Anthropic.ClaudeCodeStep 2: Verify Installation
claude --versionYou should see the Claude Code version number.
Step 3: Navigate to Your Project
cd /path/to/your/projectStep 4: Start a Simple Ralph Loop
For a basic test, try:
claude -p "Fix all ESLint errors in src/"Claude will:
- Scan your codebase
- Run ESLint
- Fix errors
- Verify fixes
- Commit changes
Step 5: Create a Ralph Loop Script
Create ralph-claude.sh for automated iterations:
#!/bin/bash

MAX_ITERATIONS=20
ITERATION=0

echo "🚀 Starting Ralph Loop with Claude Code"

while [ $ITERATION -lt $MAX_ITERATIONS ]; do
  ITERATION=$((ITERATION + 1))
  echo "📍 Iteration $ITERATION/$MAX_ITERATIONS"

  # Run Claude with your task
  claude -p "@TASK.md Check tests, fix failures, commit when all pass"

  # Check if tests pass
  if npm test; then
    echo "✅ Success! All tests passing."
    exit 0
  fi

  echo "Continuing to next iteration..."
done

echo "❌ Max iterations reached"
exit 1
Step 6: Create Task File
Create TASK.md:
# Task: Fix Failing Tests

## Success Criteria
- All tests in test/ directory pass
- No linting errors
- Code coverage above 80%

## Instructions
1. Run `npm test` to see failures
2. Analyze error messages
3. Fix issues one at a time
4. Re-run tests after each fix
5. Commit when all tests pass

## Constraints
- Do not modify test files
- Maintain existing functionality
- Follow project code style
Step 7: Run the Ralph Loop
chmod +x ralph-claude.sh
./ralph-claude.sh
Claude Code-Specific Features:
Piping for Real-Time Monitoring:
tail -f app.log | claude -p "Alert me if you see errors"CI/CD Integration:
# In your CI pipeline
claude -p "Review this PR and suggest improvements"
MCP Integration (Advanced): Claude Code supports Model Context Protocol for accessing external data:
- Google Drive documents
- Figma designs
- Slack conversations
- Custom APIs
Best Practices:
- Use
-pflag for prompts - Reference files with
@filename - Use
@webfor web searches - Keep prompts specific and measurable
- Always review commits before pushing
Common Commands:
# Fix specific issue
claude -p "Fix the TypeError in auth.js line 42"

# Build feature
claude -p "@FEATURE.md Implement this feature with tests"

# Debug
claude -p "Why is this test failing?" @test/auth.test.js

# Refactor
claude -p "Refactor this to use async/await" @src/legacy.js
Option 2: Cursor AI
Cursor has built-in agent mode that makes Ralph loops straightforward.
Prerequisites:
- Cursor IDE installed
- Active Cursor Pro subscription
- Project with automated tests
Step-by-Step Implementation:
Step 1: Enable Agent Mode
Open Cursor settings (Cmd/Ctrl + ,) and ensure “Agent Mode” is enabled. This allows Cursor to make multiple edits autonomously.
Step 2: Set Up Task Context
Create a .cursorrules file in your project root:
# Project Context for Cursor Agent

## Testing Commands
- Run tests: npm test
- Run linter: npm run lint
- Build project: npm run build

## Success Criteria
- All tests must pass
- No linting errors
- Build completes without warnings

## Constraints
- Do not modify test files
- Do not install new dependencies without asking
- Preserve existing functionality
Step 3: Use Composer Mode for Loops
- Open Composer (Cmd/Ctrl + I)
- Write your task with clear success criteria:
Task: Fix all failing tests in src/auth/

Success Criteria:
- All tests in test/auth/ pass
- No new linting errors introduced
- Code coverage stays above 80%

Instructions:
1. Run npm test to see failures
2. Fix the issues
3. Run tests again
4. Repeat until all tests pass
5. Stop when success criteria met
Step 4: Monitor Progress
Cursor will show you each iteration in the Composer panel. You can:
- See what changes it’s making
- Stop the loop at any time
- Review diffs before accepting
Step 5: Review and Accept
Once Cursor reports success:
- Review all changes in the diff view
- Run tests manually to verify
- Accept changes or request modifications
Cursor-Specific Tips:
- Use
@codebaseto give Cursor full project context - Reference specific files with
@filename - Set max iterations by saying “try up to 15 times”
- Use “Show me what you’re doing” for verbose output
Option 3: VS Code with GitHub Copilot
VS Code doesn’t have native loop support, but you can create a workflow using Copilot Chat and terminal commands.
Prerequisites:
- VS Code with GitHub Copilot extension
- GitHub Copilot Chat enabled
- Node.js/Python for scripting
Step-by-Step Implementation:
Step 1: Create a Loop Script
Create ralph-loop.js in your project root:
const { exec } = require('child_process');
const fs = require('fs');

const MAX_ITERATIONS = 20;
let iteration = 0;
let success = false;

async function runTest() {
  return new Promise((resolve) => {
    exec('npm test', (error, stdout, stderr) => {
      console.log(stdout);
      resolve(!error);
    });
  });
}

async function askCopilot(prompt) {
  // This requires manual interaction with Copilot Chat
  console.log('\n=== ITERATION', iteration + 1, '===');
  console.log('Paste this into Copilot Chat:');
  console.log(prompt);
  console.log('\nPress Enter when Copilot has made changes...');

  await new Promise(resolve => {
    process.stdin.once('data', resolve);
  });
}

async function main() {
  while (iteration < MAX_ITERATIONS && !success) {
    const testsPassed = await runTest();

    if (testsPassed) {
      console.log('✅ Success! All tests passing.');
      success = true;
      break;
    }

    await askCopilot(`
      Fix the failing tests. This is iteration ${iteration + 1}/${MAX_ITERATIONS}.

      Run: npm test
      Analyze the errors
      Fix the issues

      Focus on one error at a time.
    `);

    iteration++;
  }

  if (!success) {
    console.log('❌ Failed after', MAX_ITERATIONS, 'iterations');
    process.exit(1);
  }
}

main();
Step 2: Run the Loop
node ralph-loop.jsStep 3: Interact with Copilot
For each iteration:
- Script runs tests and shows errors
- Copy the prompt to Copilot Chat
- Let Copilot make changes
- Press Enter to continue to next iteration
VS Code-Specific Tips:
- Use Copilot’s
/fixcommand for targeted fixes - Enable “Copilot Edits” for multi-file changes
- Use workspace context with
@workspace - Set up keyboard shortcuts for faster iteration
Option 4: Google Gemini CLI
Gemini CLI has built-in ReAct (Reason and Act) loop capabilities, making it excellent for Ralph-style workflows.
Prerequisites:
- Gemini CLI installed (
npm install -g @google/generative-ai-cli) - Google AI API key
- Project with automated validation
Step-by-Step Implementation:
Step 1: Install and Configure
# Install Gemini CLI
npm install -g @google/gemini-cli

# Set up API key
export GOOGLE_AI_API_KEY="your-api-key-here"

# Verify installation
gemini --version
Step 2: Create Task Configuration
Create .gemini/config.json:
{
  "model": "gemini-2.0-flash",
  "maxIterations": 20,
  "tools": ["bash", "file_edit", "file_read"],
  "successCriteria": {
    "command": "npm test",
    "expectedExitCode": 0
  }
}
Step 3: Run Iterative Task
gemini agent "Fix all failing tests" \
  --iterate \
  --max-iterations 20 \
  --success-command "npm test"
Step 4: Monitor ReAct Loop
Gemini CLI will show you its reasoning process:
[Reasoning] Tests are failing due to TypeError in auth.js
[Action] Reading auth.js to understand the issue
[Observation] Found undefined variable on line 42
[Reasoning] Need to initialize the variable
[Action] Editing auth.js to add initialization
[Observation] Running tests to verify fix
[Reasoning] 3 tests still failing, analyzing next error...
Step 5: Review Results
Once complete, review changes:
git diffGemini CLI-Specific Tips:
- Use
--groundedflag to search web for solutions - Add custom tools with
--tool-config - Use
--memoryto persist context across sessions - Enable verbose mode with
--verbosefor debugging
Option 5: Google Antigravity (AI Coding Assistant)
Google Antigravity is an advanced AI coding assistant (that’s me!) designed for agentic coding workflows. It excels at Ralph-style iterative development through both browser and API interfaces.
Prerequisites:
- Access to Google Antigravity (via Google AI Studio or compatible platforms)
- Project with version control (Git recommended)
- Automated test suite
Step-by-Step Implementation:
Step 1: Set Up Your Project Context
Create a .antigravity/context.md file:
# Project Context

## Tech Stack
- Language: [Your language]
- Framework: [Your framework]
- Testing: [Your test framework]

## Commands
- Test: npm test
- Lint: npm run lint
- Build: npm run build

## Success Criteria
- All tests pass
- No linting errors
- Code coverage > 80%
Step 2: Create Ralph Loop Prompt
When using Antigravity, structure your prompt like this:
I need you to implement [FEATURE] using a Ralph loop approach.

TASK: [Specific feature description]

SUCCESS CRITERIA:
1. All tests in test/ pass
2. ESLint shows 0 errors
3. Code follows project conventions

ITERATION INSTRUCTIONS:
1. Analyze current test failures
2. Fix one issue at a time
3. Run tests after each fix
4. Continue until all criteria met

CONSTRAINTS:
- Do not modify test files
- Maintain backward compatibility
- Follow existing code patterns

Please iterate until success or max 20 iterations.
Step 3: Browser-Based Ralph Loop
- Open your project in your IDE
- Start Antigravity in your browser
- Paste the Ralph loop prompt
- Antigravity will:
- Analyze your codebase
- Make changes
- Run validations
- Report results
- Review suggested changes
- Apply and commit
Step 4: API-Based Automation (Advanced)
For automated Ralph loops, use the API:
import google.generativeai as genai

genai.configure(api_key='YOUR_API_KEY')
model = genai.GenerativeModel('gemini-2.0-flash')

max_iterations = 20
iteration = 0

while iteration < max_iterations:
    iteration += 1
    print(f"Iteration {iteration}/{max_iterations}")

    # Get current test status
    test_result = run_tests()  # Your test runner

    if test_result.passed:
        print("✅ Success!")
        break

    # Ask Antigravity to fix
    prompt = f"""
    Iteration {iteration}:

    Test failures: {test_result.failures}
    Error messages: {test_result.errors}

    Fix these issues. Provide the complete fixed code.
    """

    response = model.generate_content(prompt)
    apply_fixes(response.text)  # Your code to apply changes

print(f"Completed in {iteration} iterations")
Step 5: Use Tool Integration
Antigravity can use tools for better Ralph loops:
# Define tools for Antigravity
tools = [
    {
        "name": "run_tests",
        "description": "Run project tests and return results",
        "parameters": {}
    },
    {
        "name": "apply_fix",
        "description": "Apply code fix to a file",
        "parameters": {
            "file": "string",
            "content": "string"
        }
    }
]

# Antigravity will call these tools automatically
response = model.generate_content(
    prompt,
    tools=tools
)
Antigravity-Specific Features:
Multi-Modal Understanding:
- Can analyze screenshots of errors
- Understands diagrams and architecture docs
- Processes design mockups
Web Grounding:
- Searches for latest documentation
- Finds solutions to errors
- Checks current best practices
Code Understanding:
- Analyzes entire codebase context
- Understands dependencies
- Maintains consistency across files
Best Practices:
- Provide complete context in first prompt
- Use structured prompts with clear sections
- Include error messages and stack traces
- Specify file paths explicitly
- Review all changes before committing
Example Ralph Loop Session:
You: "Implement user authentication with JWT using Ralph loop approach.

Tests are in test/auth.test.js.
Success: All 8 tests pass.
Max iterations: 15.

Start iteration 1."

Antigravity: "Iteration 1: Analyzing tests...
Creating src/auth.js with JWT functions...
Running tests... 5/8 passing.
Errors: Missing middleware.

Iteration 2: Creating middleware...
Running tests... 7/8 passing.
Error: Token expiration not handled.

Iteration 3: Adding expiration logic...
Running tests... 8/8 passing! ✅

Success in 3 iterations."
Option 6: Aider (Terminal-Based AI Coding)
Aider is a terminal-based AI coding assistant that’s perfect for Ralph loops. It works best with Claude 3.7 Sonnet, DeepSeek R1 & Chat V3, OpenAI o1, o3-mini & GPT-4o, but can connect to almost any LLM including local models.
Prerequisites:
- Python 3.8+
- Aider installed (
pip install aider-chat) - API key for your preferred model (OpenAI, Anthropic, DeepSeek, etc.)
Step-by-Step Implementation:
Step 1: Install Aider
pip install aider-chat

# Configure API key (choose one based on your model)
export OPENAI_API_KEY="your-key-here"
# or
export ANTHROPIC_API_KEY="your-key-here"
# or
export DEEPSEEK_API_KEY="your-key-here"
Step 2: Start Aider with Auto-Test Mode
aider --auto-test "npm test" --test-cmd "npm test"This tells Aider to automatically run tests after each change.
Step 3: Give Iterative Instructions
In the Aider prompt:
/add src/auth/*.js test/auth/*.test.js

Fix all failing tests. Keep iterating until all tests pass.

Success criteria:
- All tests pass
- No linting errors
- Code coverage maintained

Work methodically:
1. Run tests
2. Fix one error at a time
3. Verify fix
4. Move to next error
Step 4: Let Aider Iterate
Aider will:
- Make changes
- Auto-run tests
- See results
- Make more changes
- Repeat until tests pass
Step 5: Review and Commit
/diff  # See all changes
/commit "Fixed failing tests via Ralph loop"
Aider-Specific Tips:
- Use
/testto manually trigger test runs - Use
/undoto revert last change - Use
/architectmode for planning before coding - Set
--max-chat-historyto control context window
Option 7: Continue.dev (VS Code Extension + Mission Control)
Continue.dev is an open-source AI coding platform with powerful agent workflows. It offers both IDE extensions and Mission Control for creating automated agent workflows.
Prerequisites:
- VS Code with Continue extension (or JetBrains plugin)
- API key for your preferred model (OpenAI, Anthropic, etc.)
- Optional: Continue Mission Control account for advanced features
Step-by-Step Implementation:
Step 1: Install Continue
- Install Continue extension from VS Code Marketplace
- Configure your API key in Continue settings
- Choose your model (GPT-4, Claude, etc.)
Step 2: Use Continue CLI for Ralph Loops
Continue offers a powerful CLI with two modes perfect for Ralph loops:
# Install Continue CLI
npm i -g @continuedev/cli

# TUI Mode: Interactive development
continue tui

# Headless Mode: Automated CI/CD
continue headless --task "fix-tests"
TUI Mode provides an interactive terminal interface for development workflows, perfect for HITL Ralph loops.
Headless Mode enables automated AI coding for CI/CD pipelines and server environments, ideal for AFK Ralph loops.
Step 3: Create Agent Workflows (Mission Control)
For advanced users, Continue Mission Control allows you to create automated agent workflows:
- Visit Continue Mission Control
- Create a new agent workflow
- Set triggers (Cron, Webhook, or GitHub-based)
- Define tasks and success criteria
This is perfect for scheduled Ralph loops that run automatically.
Step 4: Use in VS Code (Alternative)
For IDE-based workflows, create .continue/config.json:
{
  "slashCommands": [
    {
      "name": "ralph",
      "description": "Run Ralph loop to fix tests",
      "prompt": "Fix failing tests iteratively.\n\nProcess:\n1. Run: {{{command}}}\n2. Analyze errors\n3. Fix issues\n4. Repeat until success\n\nMax iterations: {{{maxIterations}}}\nSuccess: All tests pass"
    }
  ]
}
Step 3: Use the Ralph Command
In Continue chat:
/ralph command="npm test" maxIterations=20

Fix all failing tests in src/auth/
Step 4: Monitor Progress
Continue will show:
- Each iteration’s changes
- Test output
- Reasoning for each fix
Step 5: Accept or Reject Changes
Review the diff and accept/reject changes as needed.
Continue-Specific Tips:
- Use
@fileto reference specific files - Use
@folderfor directory context - Create custom context providers for your project
- Use
/editfor targeted changes - Integrations: Connect GitHub, Slack, Sentry, and Snyk to trigger Ralph loops automatically:
- GitHub: Auto-fix PR review comments and merge conflicts
- Slack: Mention @Continue to trigger agents
- Sentry: Automatically generate PRs to fix new issues
- Snyk: Detect and fix security vulnerabilities
Option 8: Custom Script with Any LLM API
For maximum control, create your own Ralph loop script.
Prerequisites:
- Python or Node.js
- API access to any LLM (OpenAI, Anthropic, Google, etc.)
Step-by-Step Implementation:
Step 1: Create Ralph Loop Script
Here’s a Python example using OpenAI:
import openai
import subprocess
import sys

MAX_ITERATIONS = 20
openai.api_key = "your-api-key"

def run_tests():
    """Run tests and return output"""
    result = subprocess.run(
        ['npm', 'test'],
        capture_output=True,
        text=True
    )
    return result.returncode == 0, result.stdout + result.stderr

def ask_ai(prompt, context):
    """Ask AI to fix issues"""
    response = openai.ChatCompletion.create(
        model="gpt-4",
        messages=[
            {"role": "system", "content": "You are a coding assistant. Fix issues iteratively."},
            {"role": "user", "content": f"{prompt}\n\nContext:\n{context}"}
        ]
    )
    return response.choices[0].message.content

def apply_changes(ai_response):
    """Parse AI response and apply file changes"""
    # Implementation depends on your AI's output format
    # This is simplified - you'd need proper parsing
    pass

def main():
    task = """
    Fix all failing tests in src/auth/

    Success criteria:
    - All tests pass
    - No new errors introduced
    """

    for iteration in range(MAX_ITERATIONS):
        print(f"\n=== Iteration {iteration + 1}/{MAX_ITERATIONS} ===")

        # Run tests
        tests_pass, test_output = run_tests()

        if tests_pass:
            print("✅ Success! All tests passing.")
            sys.exit(0)

        # Ask AI to fix
        print("Tests failing. Asking AI for fix...")
        ai_response = ask_ai(task, test_output)

        # Apply changes
        apply_changes(ai_response)

        print(f"Applied changes. Running tests again...")

    print(f"❌ Failed after {MAX_ITERATIONS} iterations")
    sys.exit(1)

if __name__ == "__main__":
    main()
Step 2: Customize for Your Needs
Modify the script to:
- Use your preferred LLM
- Parse AI responses correctly
- Apply file changes safely
- Add logging and monitoring
Step 3: Run Your Loop
python ralph_loop.pyCustom Script Tips:
- Add retry logic for API failures
- Implement token counting to track costs
- Save iteration history for debugging
- Add safety checks before applying changes
- Use git to create checkpoints
Tool Comparison Matrix
Here’s how these tools compare for Ralph loop workflows:
| Tool | Ease of Setup | Automation Level | Cost | Best For |
|---|---|---|---|---|
| Claude Code | Easy | High | $$$ | Professional use, complex tasks |
| Cursor | Easy | High | $$ | Visual workflow, beginners |
| Gemini CLI | Medium | High | $ | Terminal lovers, Google ecosystem |
| Aider | Medium | High | $-$$$ | Terminal-based, model flexibility |
| VS Code + Copilot | Easy | Medium | $$ | Existing VS Code users |
| Continue.dev | Easy | Medium | $-$$$ | Open-source, customization |
| Custom Script | Hard | Full control | $-$$$ | Maximum flexibility, specific needs |
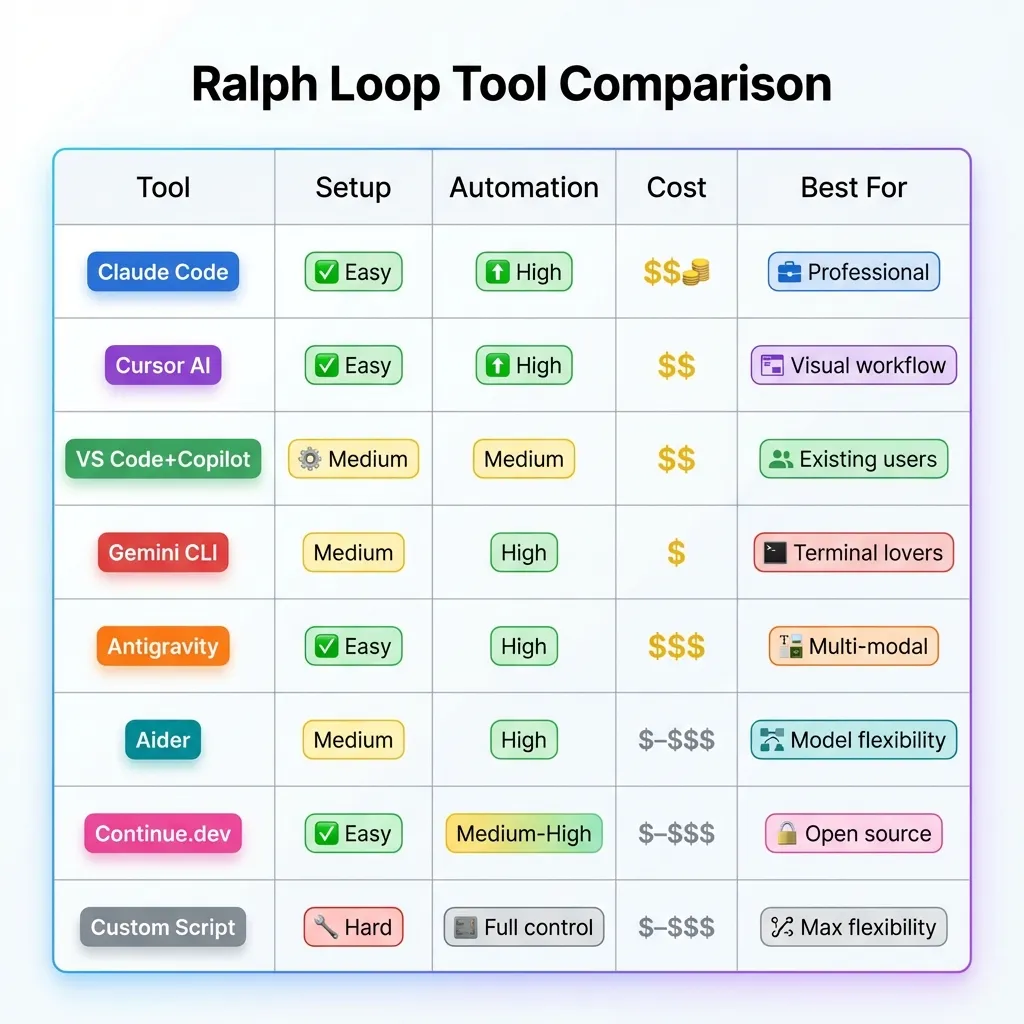 Compare 8 different tools for implementing Ralph Loops - find the best fit for your workflow.
Choosing the Right Tool
Choose Claude Code if:
- You want official support and best-in-class experience
- Budget isn’t a primary concern
- You need enterprise-grade safety controls
Choose Cursor if:
- You prefer visual IDE experience
- You want built-in agent mode
- You’re comfortable with proprietary tools
Choose Gemini CLI if:
- You work primarily in terminal
- You want Google’s latest models
- You need web grounding capabilities
Choose Antigravity if:
- You need multi-modal understanding (screenshots, diagrams)
- You want web-grounded responses with latest info
- You prefer browser-based or API-based workflows
- You need complex reasoning for architecture decisions
Choose Aider if:
- You love terminal-based workflows
- You want model flexibility (OpenAI, Anthropic, etc.)
- You need git integration
Choose VS Code + Copilot if:
- You’re already using VS Code
- You have GitHub Copilot subscription
- You want familiar environment
Choose Continue.dev if:
- You want open-source solution
- You need extensive customization
- You want to self-host
Choose Custom Script if:
- You need maximum control
- You have specific requirements
- You’re comfortable with coding
Note on Other Tools
Tools Not Covered (as of January 2026):
- Codex CLI: OpenAI’s Codex is available via API but doesn’t have a standalone CLI tool for Ralph loops. Use the Custom Script approach with OpenAI API instead.
- Opencode CLI: Not a current standalone product. You may be thinking of open-source alternatives like Aider or Continue.dev.
- AMP Code CLI: Not a verified product as of 2026. For Google AI coding, use Gemini CLI or Antigravity.
If you’re looking for these tools, the verified alternatives above (Claude Code, Cursor, Gemini CLI, Antigravity, Aider, Continue.dev) provide similar or better functionality for Ralph loop workflows.
Universal Best Practices
Regardless of which tool you choose:
- Start with clear success criteria - Define what “done” looks like
- Set iteration limits - Prevent runaway costs
- Use version control - Commit before starting loops
- Monitor costs - Track token usage and API calls
- Review output - Always verify AI changes before deploying
- Sandbox execution - Run in isolated environments
- Log everything - Keep records of iterations and changes
- Start small - Test on low-risk tasks first
Conclusion
The Ralph Wiggum AI loop technique represents a shift in how we collaborate with AI. Instead of asking for answers, we define outcomes and let AI iterate until they’re achieved.
Key Takeaways:
- What It Is: Persistent AI iteration until success criteria met
- Why It Works: Treats failures as data, enables autonomous problem-solving
- Best For: Mechanical tasks with clear, verifiable success conditions
- Not For: Subjective, creative, or security-critical tasks
- Cost: Token usage adds up; budget and monitor accordingly
- Safety: Always sandbox, review output, set iteration limits
The Revolution in Progress
We’re witnessing a shift from AI-assisted to AI-autonomous development. Meme culture is making complex tech accessible. Iteration-first development is becoming mainstream.
But human expertise remains essential. The Ralph loop gets you 80-90% of the way there. You still need judgment, creativity, and critical thinking for the final 10-20%.
Your Next Steps
- Install Claude Code and experiment
- Start with simple, low-risk tasks
- Build your prompt template library
- Join the community, share learnings
- Stay updated on evolving best practices
The Dual Trend
Don’t forget: “Ralph Wiggum AI” also refers to voice generation for memes and viral content. Both trends reflect AI’s growing capabilities. Both raise important ethical questions. Both show how meme culture shapes tech adoption.
Final Thought
The Ralph Wiggum technique isn’t just about automating coding tasks—it’s about reimagining how we collaborate with AI. By embracing iteration over perfection and treating failures as learning opportunities, we’re building a new paradigm for software development.
Whether you’re debugging tests or refactoring legacy code, the Ralph loop offers a glimpse into the future of agentic AI. Just remember: like Ralph himself, the technique works best when you give it clear direction, appropriate guardrails, and don’t expect perfection on the first try.
“I’m helping!” indeed.
Frequently Asked Questions
What is the Ralph Wiggum AI loop?
The Ralph Wiggum AI loop is an iterative development technique where an AI agent repeatedly attempts a task until specific completion criteria are met. Named after The Simpsons character, it embodies persistent iteration and learning from failures. It’s implemented as a simple while loop that feeds prompts to an AI agent, validates results, and continues until success or max iterations.
Who created the Ralph Wiggum technique?
Geoffrey Huntley popularized the technique, describing it simply as “Ralph is a Bash loop.” While the concept of iterative AI workflows existed before, Huntley’s naming and framing helped it go viral in the developer community in late 2024 and early 2025.
How is Ralph Wiggum loop different from normal AI prompting?
Traditional AI prompting is one-shot: you ask, AI responds, done. The Ralph loop is iterative: AI attempts, gets feedback (test results, errors), adjusts approach, and tries again until success. It’s the difference between “give me an answer” and “keep working until it’s right.”
What are the best use cases for Ralph Wiggum loops?
Ideal for mechanical tasks with clear success criteria: fixing failing tests, refactoring code while preserving functionality, dependency upgrades, applying linting rules, and debugging with specific error messages. Works best when automated validation (tests, linters, builds) provides objective feedback.
What are the risks of using Ralph Wiggum loops?
Main risks include token costs spiraling on complex tasks, potential for infinite loops without proper limits, code quality degradation (AI makes it “work” but introduces technical debt), and security vulnerabilities if AI has too much autonomy. Always sandbox, set iteration limits, and review output.
How much does it cost to run a Ralph Wiggum loop?
Costs vary by task complexity and iterations needed. Simple tasks (5 iterations, 2K tokens each): ~$0.15. Medium tasks (15 iterations, 4K tokens): ~$0.90. Complex tasks (30 iterations, 6K tokens): ~$2.70. Monitor usage and set budgets to avoid surprises.
Can I use Ralph Wiggum loops with tools other than Claude Code?
Yes! While Claude Code has official support, you can implement Ralph loops with any AI tool that supports iterative prompting: Cursor AI, GitHub Copilot with custom scripts, OpenAI API with custom loops, or other agentic AI platforms. The core concept is tool-agnostic.
What’s the difference between Ralph Wiggum AI loop and Ralph Wiggum AI voice?
They’re two separate trends that share a name. The “loop” is a coding technique for iterative AI development. The “voice” is AI-generated audio mimicking Ralph Wiggum’s voice from The Simpsons, used for memes and viral content. Both emerged around 2024 and both leverage AI, but serve completely different purposes.
How do I prevent infinite loops?
Always set a maximum iteration limit (typically 10-50 depending on task complexity). Include timeout limits per iteration. Define clear, achievable success criteria. Monitor execution and have manual override capability. If hitting max iterations repeatedly, the task likely needs better definition or decomposition.
Is the Ralph Wiggum technique suitable for beginners?
Yes, but start small! Begin with simple, low-risk tasks like fixing linting errors in a single file. As you gain confidence and understand how the AI iterates, tackle more complex problems. The technique actually makes some advanced tasks more accessible to beginners by automating the trial-and-error process.